发布订阅
前面我们了解了如果在 Dapr 下面进行服务调用,以及最简单的状态管理,本节我们来了解如何启用 Dapr 的发布/订阅模式,发布者将生成特定主题的消息,而订阅者将监听特定主题的信息。
- 使用发布服务,开发人员可以重复发布消息到一个主题上。
- Pub/sub 组件对这些消息进行排队处理。
- 该主题订阅者将从队列中获取到消息并处理他们。
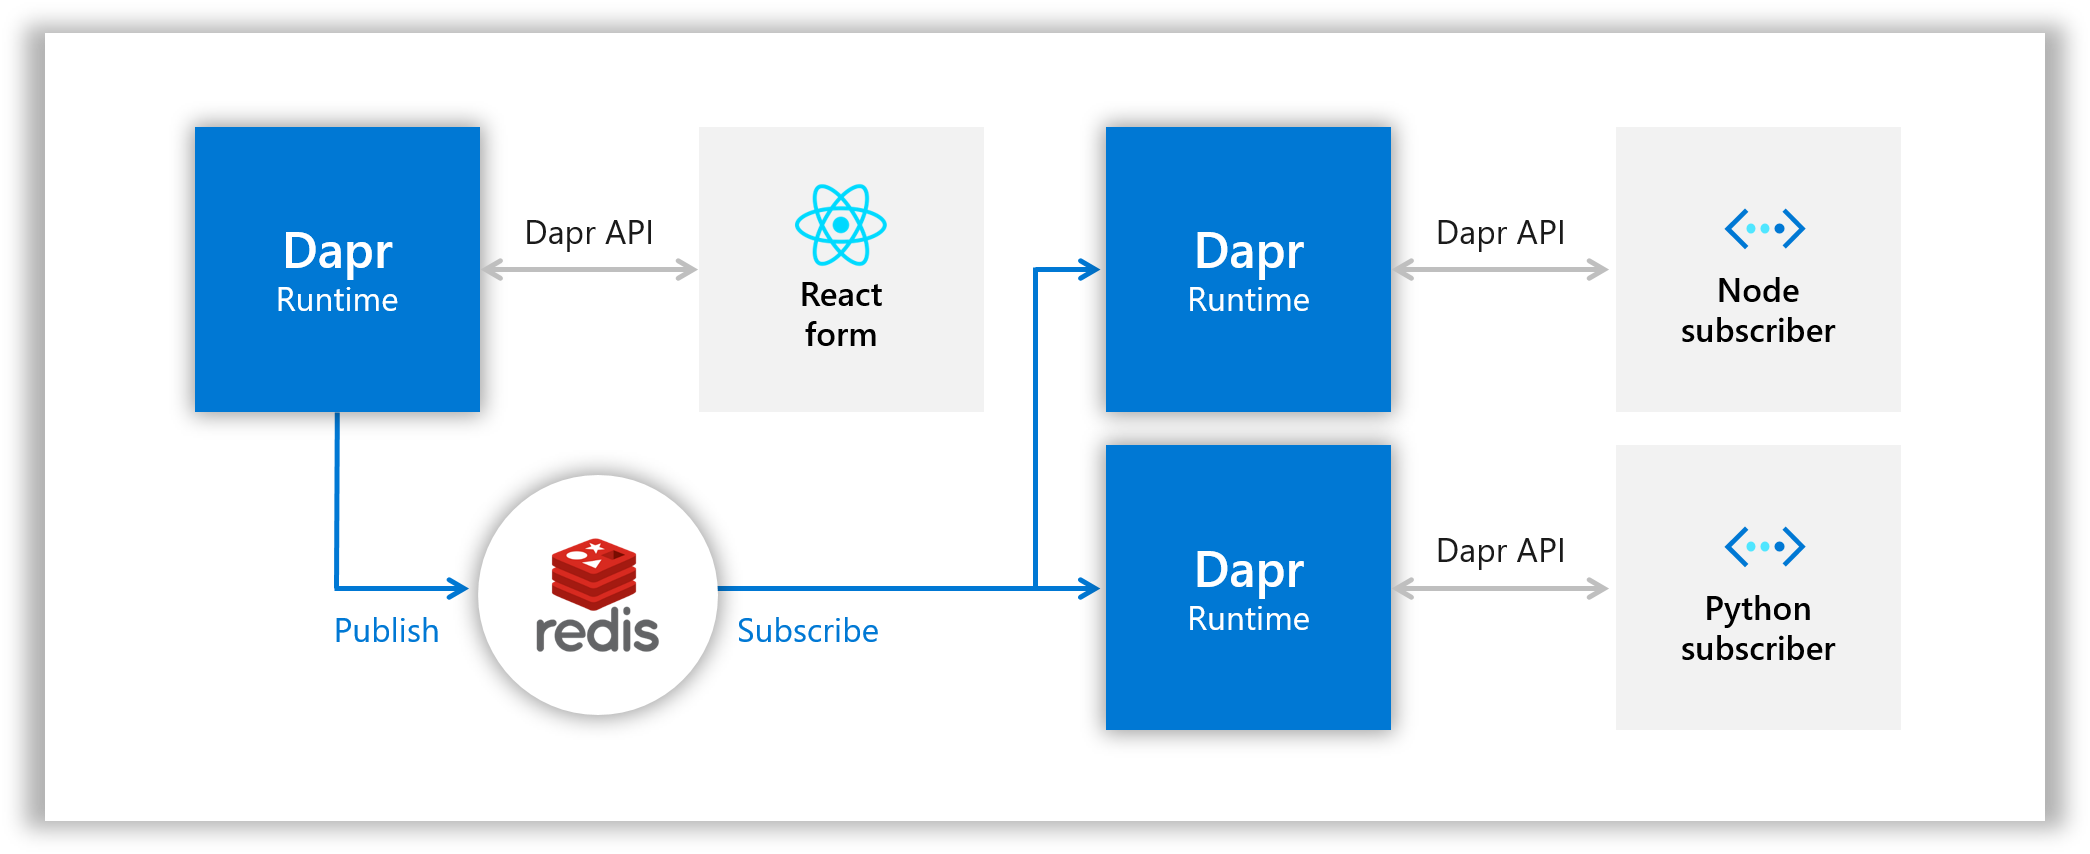
接下来我们使用的这个示例包含一个发布者:
- React 前端消息生成器
包含另外 3 个消息订阅者:
- Node.js 订阅者
- Python 订阅者
- C# 订阅者
Dapr 使用可插拔的消息总线来支持发布-订阅,并将消息传递给 CloudEvents(一个 CNCF 项目) 作为通用的事件信封格式,以提高连接服务的互操作性。
我们这里将使用 Redis Streams(在 Redis version = > 5 中启用),当然也可以使用 RabbitMQ、Kafka 等中间件。下图是用来说明组件之间是如何在本地模式下互相连接的。
本地初始化
Dapr 允许你将相同的微服务从本地机器部署到云环境中去,这里为了和大家说明这种便利性,我们先在本地部署这个实例项目,然后在将其部署到 Kubernetes 环境中去。
要在本地使用 Dapr 服务,需要先在本地初始化 Dapr:
$ dapr init
由于某些网络原因使用上面的命令可能并不能初始化成功,我们可以使用离线的方式进行安装,前往 https://github.com/dapr/installer-bundle/releases 下载对应系统的 Bundle 👝 包,然后解压,比如我这里是 Mac M1,使用下面的命令下载:
$ wget https://github.91chi.fun/https://github.com/dapr/installer-bundle/releases/download/v1.8.4/daprbundle_darwin_arm64.tar.gz
$ tar -xvf daprbundle_darwin_arm64.tar.gz
x daprbundle/
x daprbundle/README.md
x daprbundle/dapr
x daprbundle/details.json
x daprbundle/dist/
x daprbundle/dist/daprd_darwin_arm64.tar.gz
x daprbundle/dist/dashboard_darwin_arm64.tar.gz
x daprbundle/dist/placement_darwin_arm64.tar.gz
x daprbundle/docker/
x daprbundle/docker/daprio-dapr-1.8.4.tar.gz
然后我们可以重新使用下面的命令进行初始化:
$ dapr init --from-dir daprbundle/
⌛  Making the jump to hyperspace...
⚠  Local bundle installation using --from-dir flag is currently a preview feature and is subject to change. It is only available from CLI version 1.7 onwards.
ℹ️  Installing runtime version 1.8.4
↙  Extracting binaries and setting up components...
Dapr runtime installed to /Users/cnych/.dapr/bin, you may run the following to add it to your path if you want to run daprd directly:
    export PATH=$PATH:/Users/cnych/.dapr/bin
8d7366c22fd8: Loading layer [==================================================>]  3.697MB/3.697MB
61f7f94319f6: Loading layer [==================================================>]  238.6MB/238.6MB
←  Extracting binaries and setting up components... Loaded image: daprio/dapr:1.8.4
✅  Extracting binaries and setting up components...
✅  Extracted binaries and completed components set up.
ℹ️  daprd binary has been installed to /Users/cnych/.dapr/bin.
ℹ️  dapr_placement container is running.
ℹ️  Use `docker ps` to check running containers.
$ dapr version
CLI version: 1.8.0
Runtime version: 1.8.4
默认会启用 zipkin 这个 tracing 服务,使用上面的命令初始化如果没有对应的容器,则可以使用 docker run --name dapr_zipkin -d -p 9411:9411 dockerproxy.com/openzipkin/zipkin 启动该服务。
同样如果没有 redis 服务,则可以使用 docker run --name dapr_redis -d -p 6379:6379 dockerproxy.com/redislabs/rejson 启动该服务。

消息订阅服务
这里我们还是使用前面使用的 quickstarts 这个项目,克隆项目到本地:
git clone [-b <dapr_version_tag>] https://github.com/dapr/quickstarts.git
进入 tutorials/pub_sub 目录下面:
➜  pub-sub git:(622b7d9) ls
README.md         deploy            makefile          message_b.json    node-subscriber   react-form
csharp-subscriber img               message_a.json    message_c.json    python-subscriber
运行 Node 消息订阅服务
首先我们使用 Dapr 运行 node 消息订阅服务,导航到 node-subscriber 目录,安装依赖:
$ cd node-subscriber
$ npm install  # 或者 yarn
执行如下所示命令运行 node 消息订阅服务:
$ dapr run --app-id node-subscriber --app-port 3000 node app.js
ℹ️  Starting Dapr with id node-subscriber. HTTP Port: 50728. gRPC Port: 50729
INFO[0000] starting Dapr Runtime -- version 1.8.4 -- commit 18575823c74318c811d6cd6f57ffac76d5debe93  app_id=node-subscriber instance=MBP2022.local scope=dapr.runtime type=log ver=1.8.4
# ......
INFO[0000] app is subscribed to the following topics: [A B] through pubsub=pubsub  app_id=node-subscriber instance=MBP2022.local scope=dapr.runtime type=log ver=1.8.4
INFO[0000] dapr initialized. Status: Running. Init Elapsed 312.69599999999997ms  app_id=node-subscriber instance=MBP2022.local scope=dapr.runtime type=log ver=1.8.4
INFO[0000] placement tables updated, version: 0          app_id=node-subscriber instance=MBP2022.local scope=dapr.runtime.actor.internal.placement type=log ver=1.8.4
ℹ️  Updating metadata for app command: node app.js
✅  You're up and running! Both Dapr and your app logs will appear here.
上面命令中的 app-id 是微服务的唯一标识符,--app-port 是 Node 应用程序运行的端口,最后,运行应用程序的命令是 node app.js。
运行 Python 消息订阅服务
接下来使用 Dapr 运行 Python 消息订阅服务,导航到 python-subscriber 目录:
$ cd python-subscriber
安装应用依赖:
$ pip3 install -r requirements.txt
同样再次使用 dapr run 来运行该订阅服务:
$ dapr run --app-id python-subscriber --app-port 5001 python3 app.py
ℹ️  Starting Dapr with id python-subscriber. HTTP Port: 55508. gRPC Port: 55509
INFO[0000] starting Dapr Runtime -- version 1.8.4 -- commit 18575823c74318c811d6cd6f57ffac76d5debe93  app_id=python-subscriber instance=MBP2022.local scope=dapr.runtime type=log ver=1.8.4
INFO[0000] log level set to: info                        app_id=python-subscriber instance=MBP2022.local scope=dapr.runtime type=log ver=1.8.4
INFO[0000] enabled gRPC metrics middleware               app_id=python-subscriber instance=MBP2022.local scope=dapr.runtime.grpc.internal type=log ver=1.8.4
INFO[0000] internal gRPC server is running on port 55514  app_id=python-subscriber instance=MBP2022.local scope=dapr.runtime type=log ver=1.8.4
INFO[0000] application protocol: http. waiting on port 5001.  This will block until the app is listening on that port.  app_id=python-subscriber instance=MBP2022.local scope=dapr.runtime type=log ver=1.8.4
INFO[0000] application discovered on port 5001           app_id=python-subscriber instance=MBP2022.local scope=dapr.runtime type=log ver=1.8.4
WARN[0000] [DEPRECATION NOTICE] Adding a default content type to incoming service invocation requests is deprecated and will be removed in the future. See https://docs.dapr.io/operations/support/support-preview-features/ for more details. You can opt into the new behavior today by setting the configuration option `ServiceInvocation.NoDefaultContentType` to true.  app_id=python-subscriber instance=MBP2022.local scope=dapr.runtime type=log ver=1.8.4
== APP ==  * Serving Flask app "app" (lazy loading)
== APP ==  * Environment: production
== APP ==    WARNING: This is a development server. Do not use it in a production deployment.
== APP ==    Use a production WSGI server instead.
== APP ==  * Debug mode: off
== APP ==  * Running on http://127.0.0.1:5001/ (Press CTRL+C to quit)
ℹ️  Updating metadata for app command: python3 app.py
✅  You're up and running! Both Dapr and your app logs will appear here.
由于我们这里没有 C# 环境,所以只运行 Node 和 Python 这两个消息订阅服务了。
消息发布服务
接下来我们来运行 React 这个前端消息发布服务,同样先导航到 react-form 项目目录下面:
$ cd react-form
然后执行下面的命令安装依赖并构建服务:
$ npm run buildclient
$ npm install
构建完成后可以使用下面的 dapr 命令来启动该前端服务:
$ dapr run --app-id react-form --app-port 8080 npm run start
ℹ️  Starting Dapr with id react-form. HTTP Port: 57303. gRPC Port: 57304
INFO[0000] starting Dapr Runtime -- version 1.8.4 -- commit 18575823c74318c811d6cd6f57ffac76d5debe93  app_id=react-form instance=MBP2022.local scope=dapr.runtime type=log ver=1.8.4
# ......
== APP ==
== APP == > react-form@1.0.0 start
== APP == > node server.js
== APP ==
== APP == Listening on port 8080!
INFO[0000] application discovered on port 8080           app_id=react-form instance=MBP2022.local scope=dapr.runtime type=log ver=1.8.4
# ......
INFO[0000] dapr initialized. Status: Running. Init Elapsed 760.39ms  app_id=react-form instance=MBP2022.local scope=dapr.runtime type=log ver=1.8.4
ℹ️  Updating metadata for app command: npm run start
✅  You're up and running! Both Dapr and your app logs will appear here.

INFO[0001] placement tables updated, version: 0          app_id=react-form instance=MBP2022.local scope=dapr.runtime.actor.internal.placement type=log ver=1.8.4
当看到 == APP == Listening on port 8080! 这样的日志时,表示应用启动成功了。然后我们就可以在浏览器中访问 http://localhost:8080 访问前端应用了。
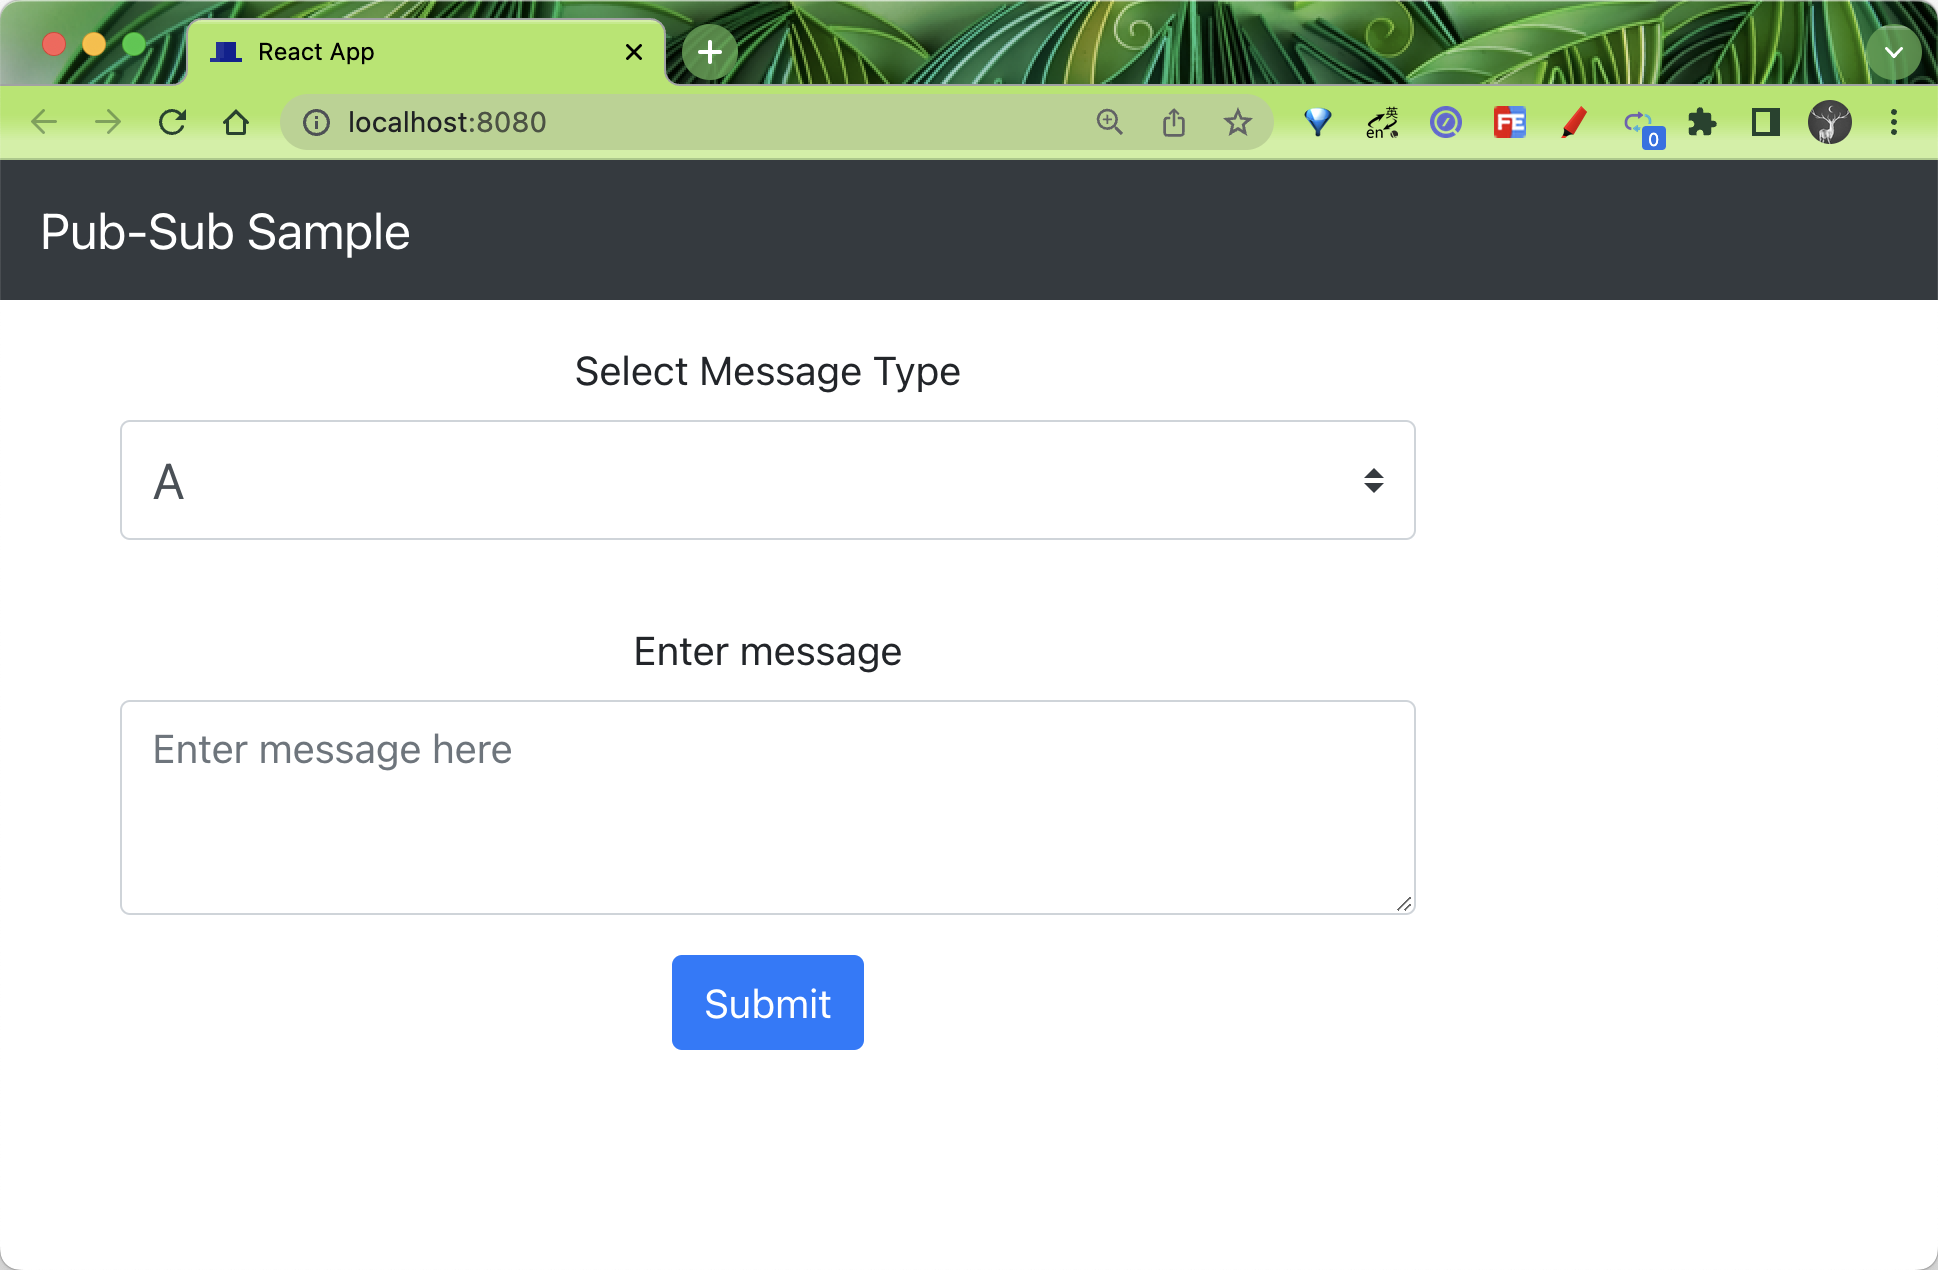
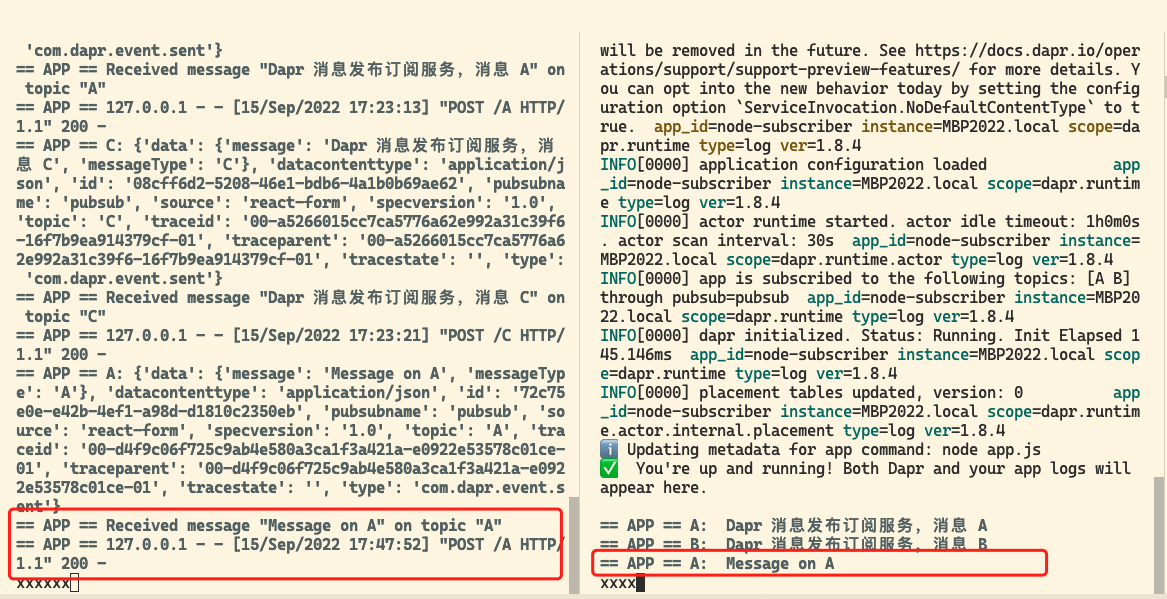
比如现在我们选择消息类型 A,然后随便输入一些消息内容,点击 Submit 发送,然后观察上面的 Node 和 Python 这两个消息订阅者服务的日志。
选择一个主题,输入一些文字,然后发送一条信息!观察通过你们各自的 Dapr 的日志。
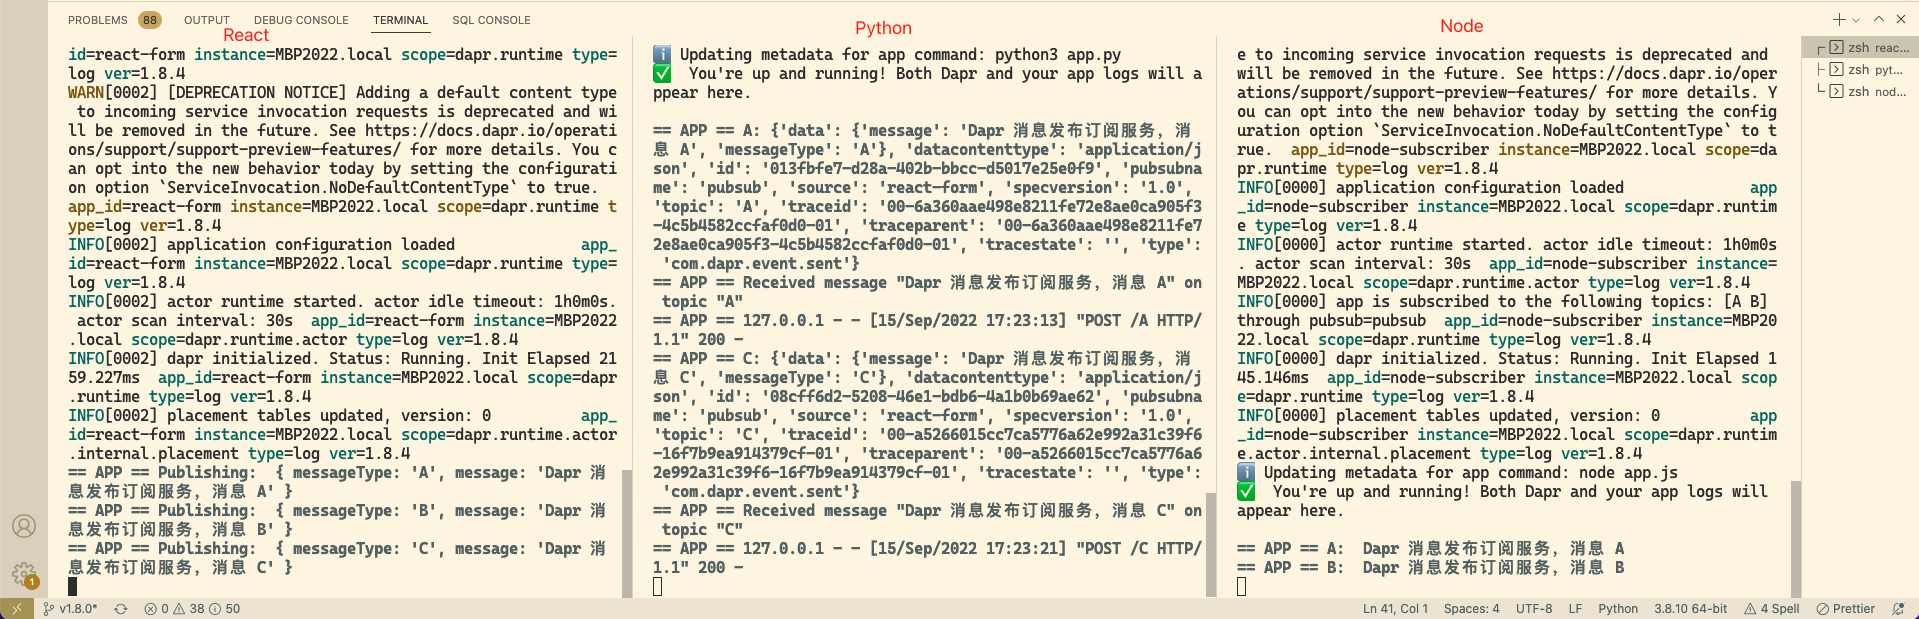
注意,Node 订阅者接收类型为 A 和 B 的消息,而 Python 订阅者接收类型为 A和 C 的消息,所以注意每个控制台窗口的日志显示。
此外 Dapr CLI 提供了一个机制来发布消息用于测试,比如我们可以使用如下命令来发布一条消息:
$ dapr publish --publish-app-id react-form --pubsub pubsub --topic A --data-file message_a.json
到这里我们就完成了使用 Dapr 来进行消息订阅发布的功能演示。
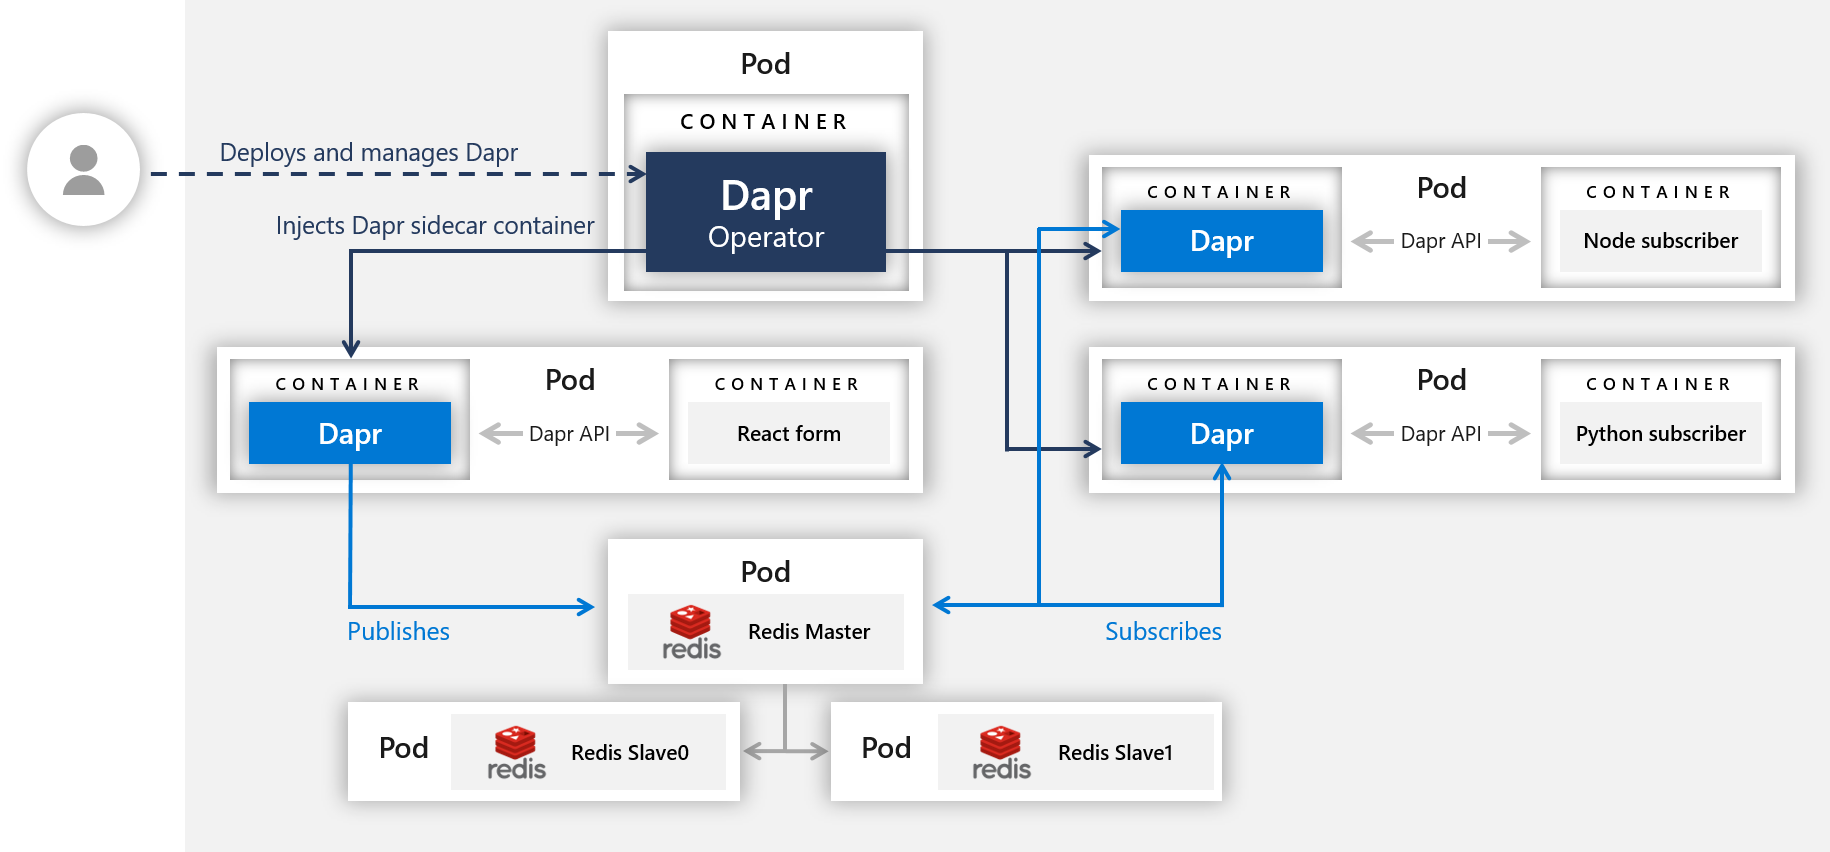
在 Kubernetes 中运行
上面我们是将演示服务在本地部署的,我们知道使用 Dapr 开发的服务是和平台没关系的,可以很轻松迁移到云环境,比如现在我们再将上面的示例应用部署到 Kubernetes 集群中。
要在 Kubernetes 中运行相同的代码,首先需要设置 Redis 存储,然后部署微服务,将使用相同的微服务,但最终架构有所不同:
前面我们已经使用 Helm 安装了 bitnami 下面的 redis 应用:
$ helm repo add bitnami https://charts.bitnami.com/bitnami
$ helm repo update
$ helm install redis bitnami/redis
有了 Redis 服务过后,接着我们需要创建一个发布订阅的 Component 组件,前文是创建的一个使用 Redis 的状态管理组件,对应的组件资源清单如下所示:
# deploy/redis.yaml
apiVersion: dapr.io/v1alpha1
kind: Component
metadata:
  name: pubsub
spec:
  type: pubsub.redis
  version: v1
  metadata:
    # These settings will work out of the box if you use `helm install
    # bitnami/redis`.  If you have your own setup, replace
    # `redis-master:6379` with your own Redis master address, and the
    # Redis password with your own Secret's name. For more information,
    # see https://docs.dapr.io/operations/components/component-secrets .
    - name: redisHost
      value: redis-master:6379
    - name: redisPassword
      secretKeyRef:
        name: redis
        key: redis-password
auth:
  secretStore: kubernetes
直接应用上面的资源清单即可:
$ kubectl apply -f deploy/redis.yaml
component.dapr.io/pubsub created
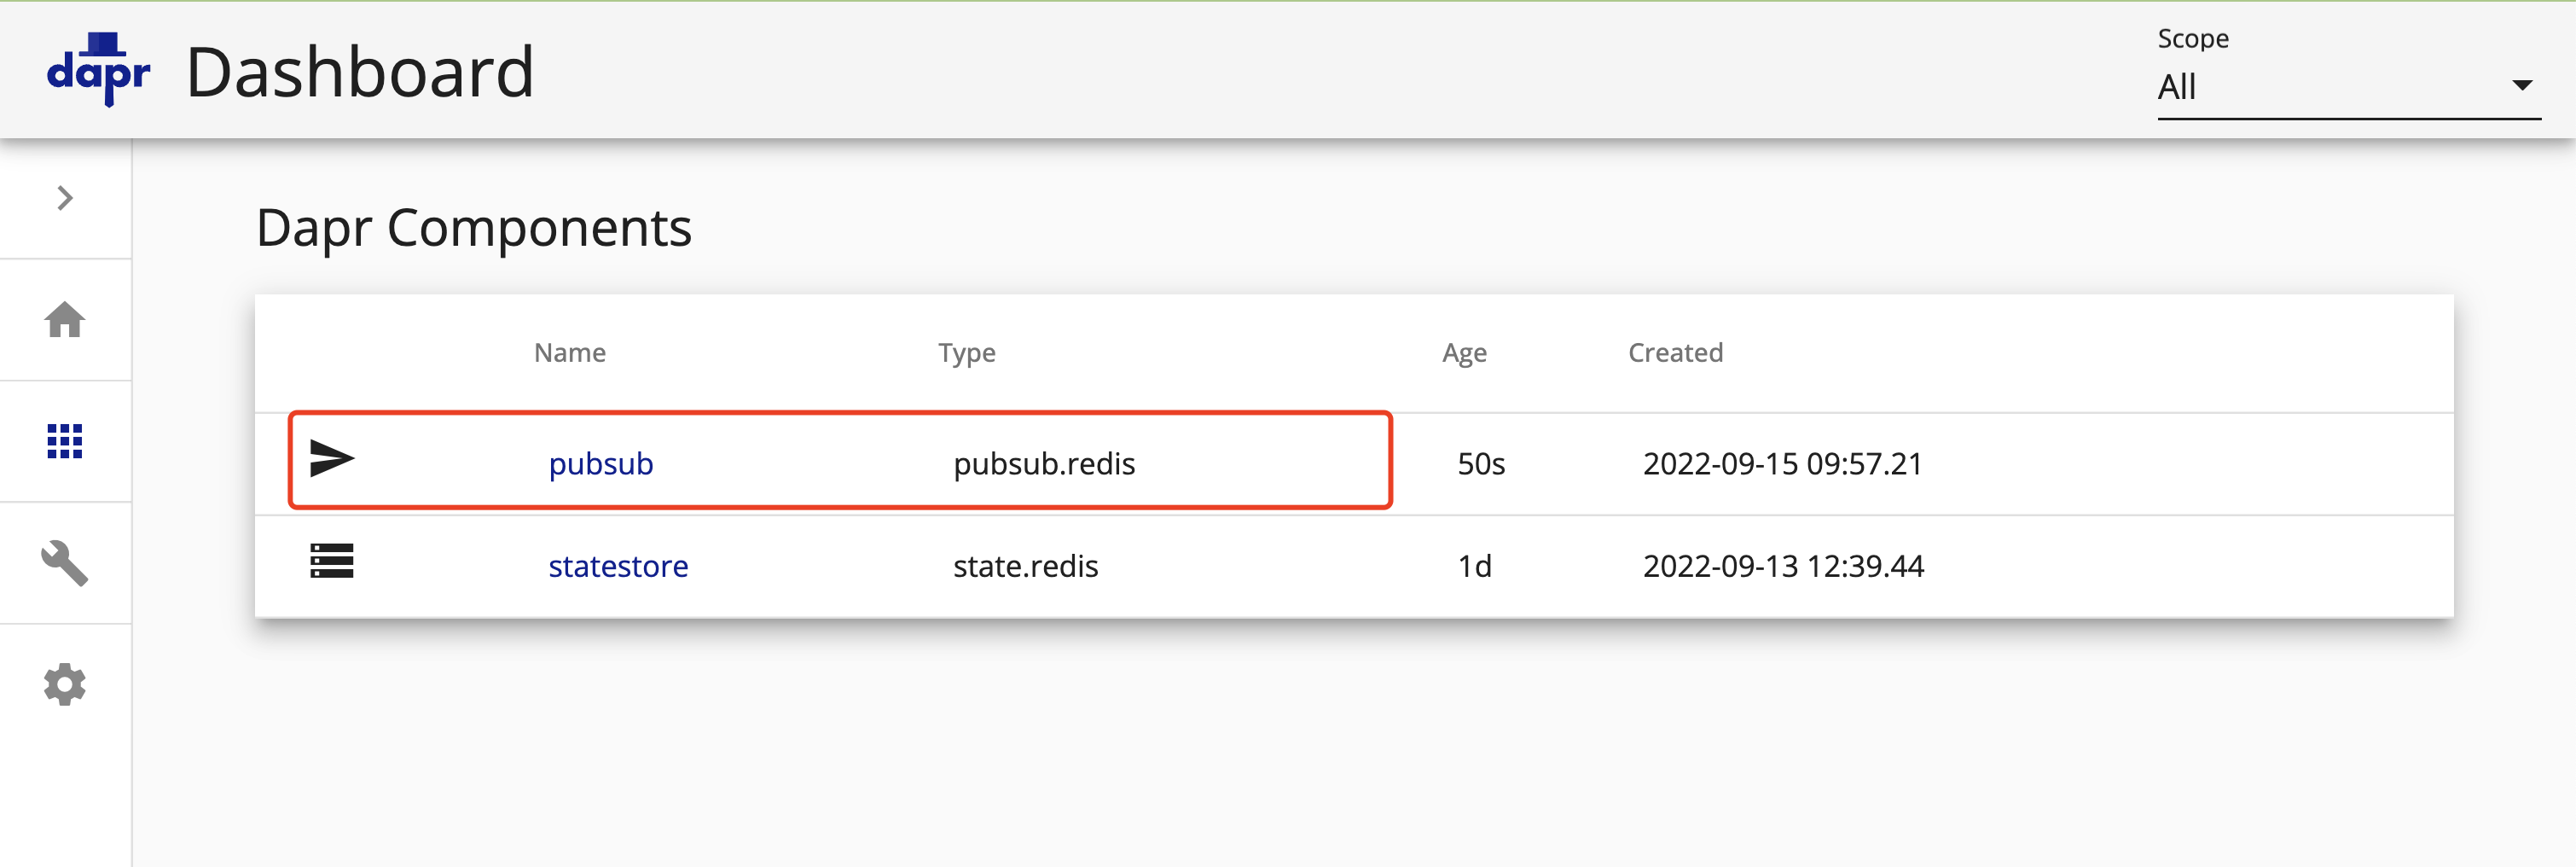
$ kubectl get components
NAME AGE
pubsub 26s
statestore 45h
现在我们就有了一个使用 Redis 为中间件的发布订阅组件了,注意上面对象的类型为 pubsub.redis。
接着我们就可以部署 Python、Node 和 React-form 这 3 个微服了:
$ kubectl apply -f deploy/node-subscriber.yaml
$ kubectl apply -f deploy/python-subscriber.yaml
$ kubectl apply -f deploy/react-form.yaml
部署后查看 Pod 的状态:
$ kubectl get pods
NAME                                 READY   STATUS    RESTARTS         AGE
node-subscriber-5b5777c785-z8jzn     2/2     Running   0                30m
python-subscriber-76d9fc6c87-ffj7r   2/2     Running   0                30m
react-form-68db4b7777-7qmtj          2/2     Running   0                30m
react-form 这个微服务会通过一个 LoadBalancer 类型的 Service 来对外暴露服务:
$ kubectl get svc
NAME                     TYPE           CLUSTER-IP       EXTERNAL-IP    PORT(S)                               AGE
node-subscriber-dapr     ClusterIP      None             <none>         80/TCP,50001/TCP,50002/TCP,9090/TCP   31m
python-subscriber-dapr   ClusterIP      None             <none>         80/TCP,50001/TCP,50002/TCP,9090/TCP   31m
react-form               LoadBalancer   10.110.199.146   192.168.0.51   80:32510/TCP                          30m
react-form-dapr          ClusterIP      None             <none>         80/TCP,50001/TCP,50002/TCP,9090/TCP   30m
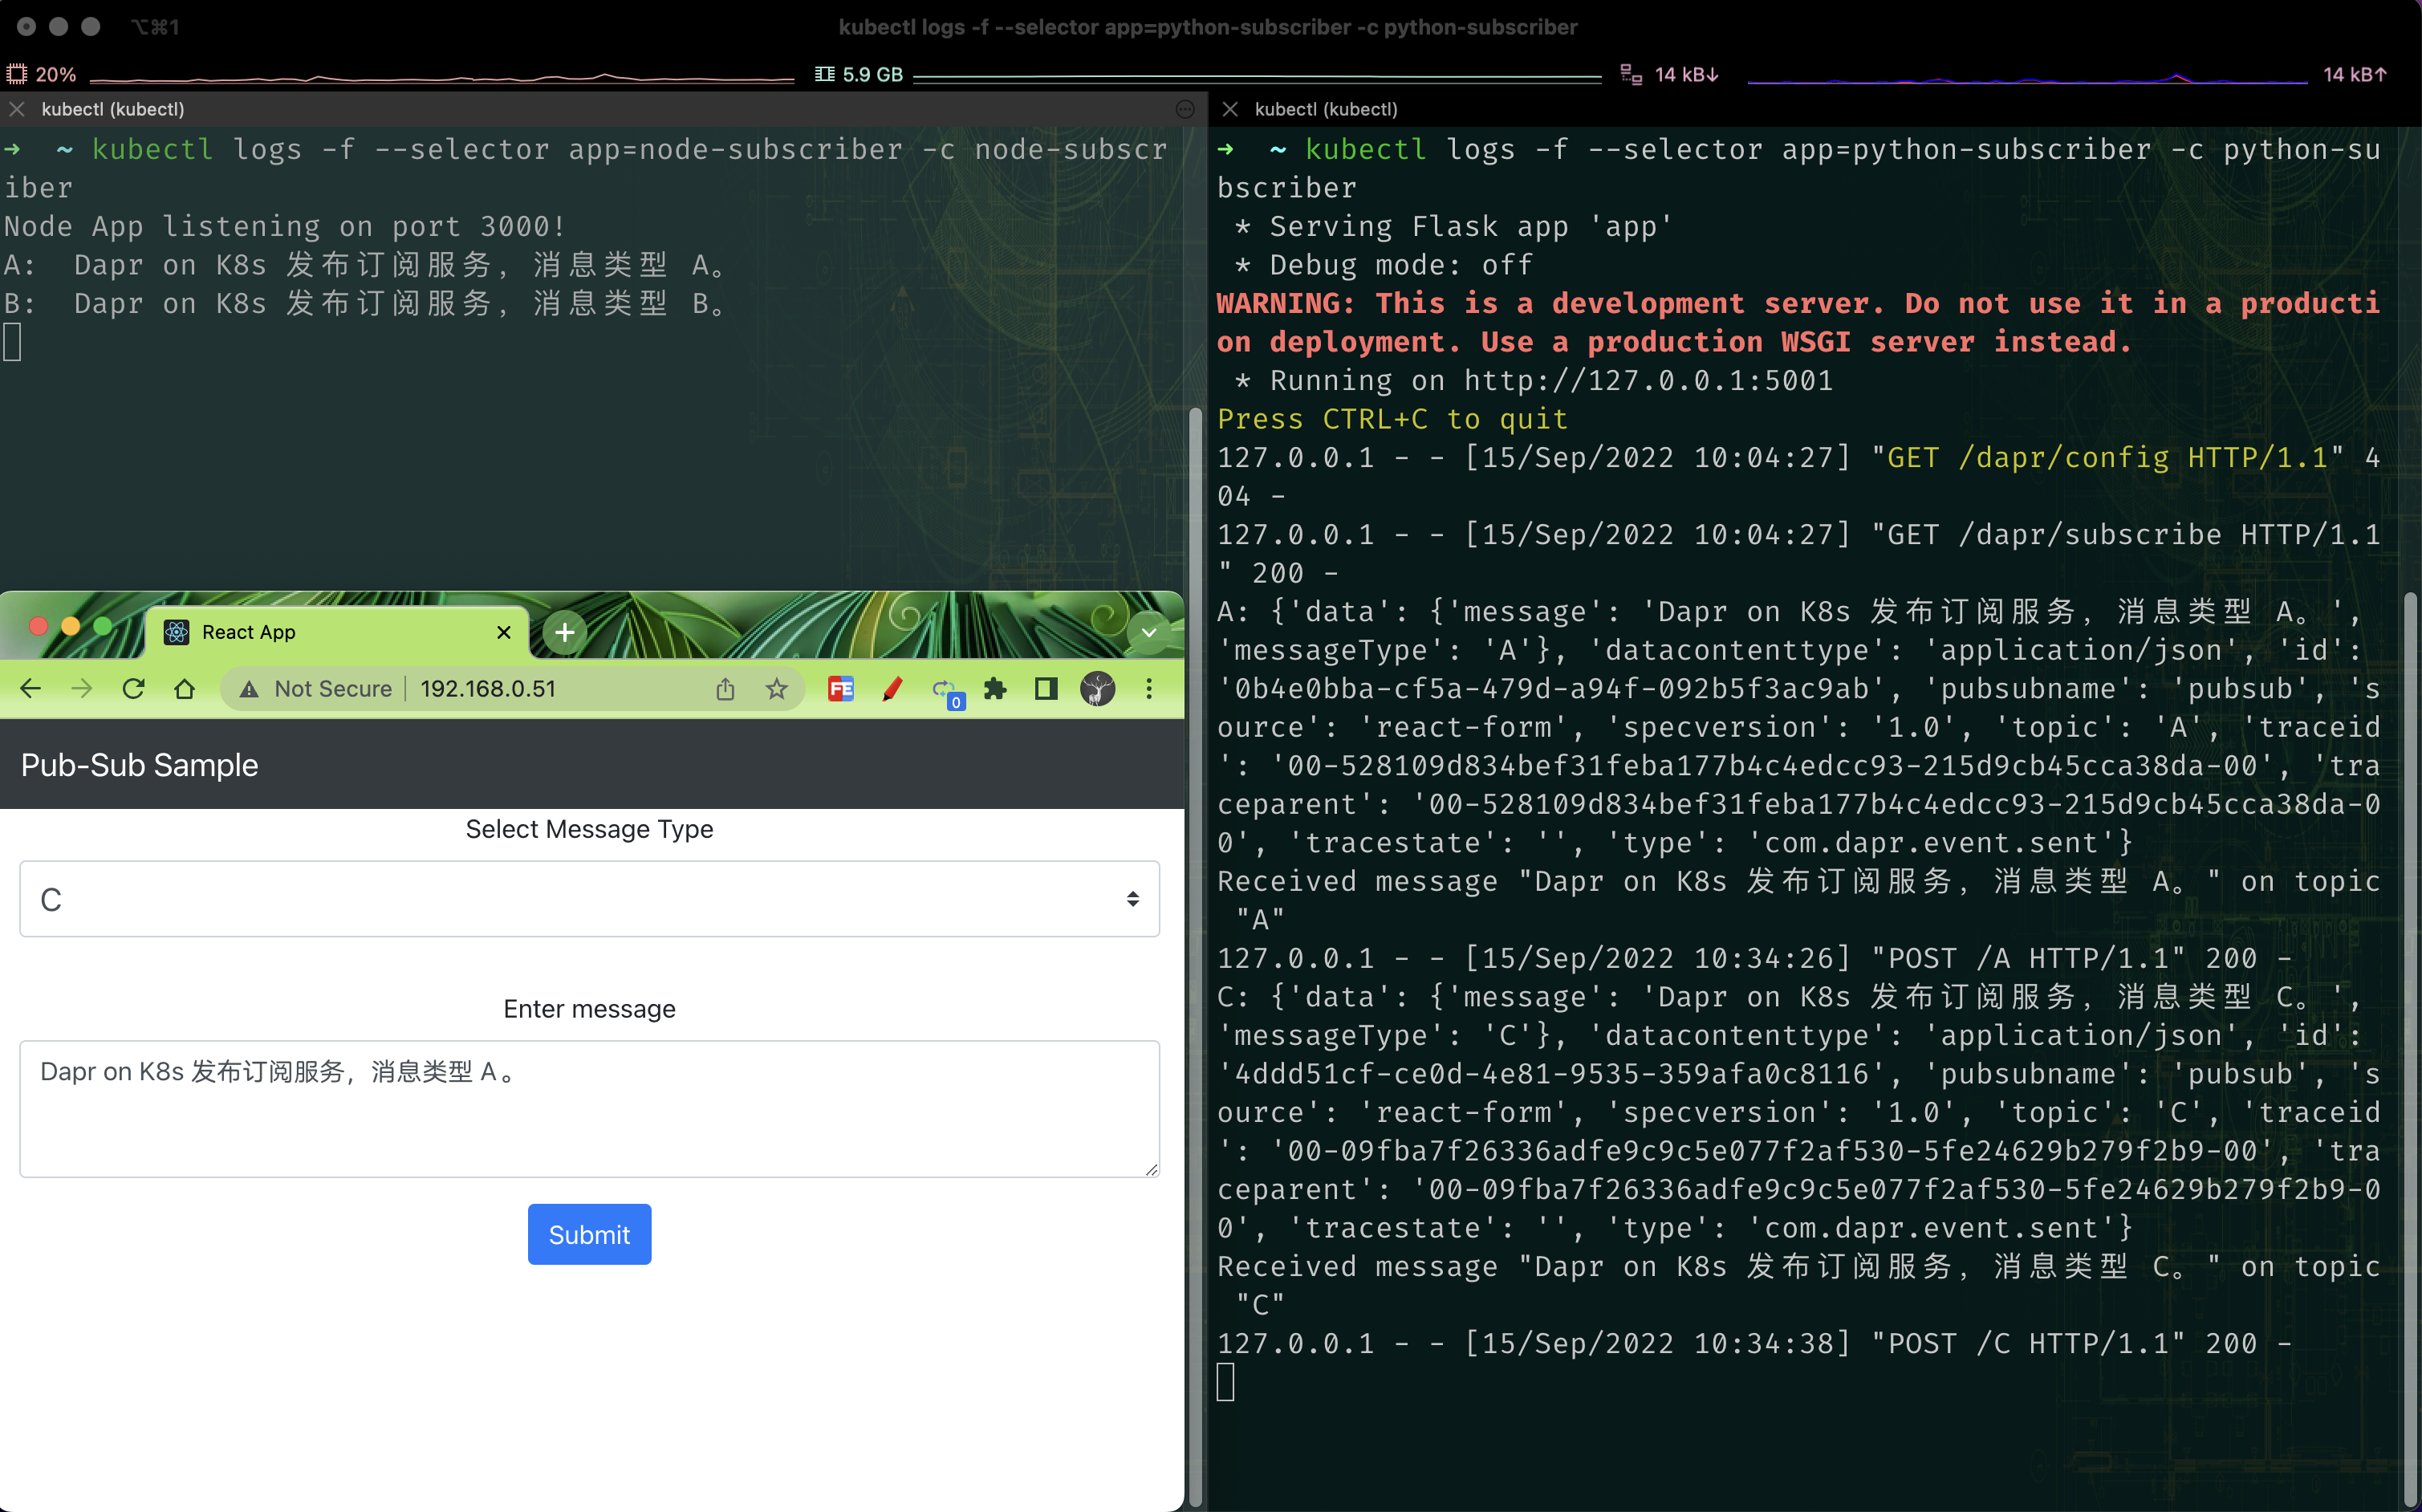
然后我们就可以通过分配的 EXTERNAL-IP 访问前端服务了。同样在前端页面发送几个不同的消息通知,然后使用 kubectl logs 观察 Node 和 Python 订阅服务的日志。
$ kubectl logs --selector app=node-subscriber -c node-subscriber
$ kubectl logs --selector app=python-subscriber -c python-subscriber
如何工作
现在,我们已经在本地和 Kubernetes 中运行了订阅发布示例应用,接下来我们来分析下这是如何工作的。该应用程序分为两个订阅者和一个发布者。
Node 消息订阅服务
重新导航到 node-scriber 目录并查看 Node.js 订阅者代码 app.js,该服务通过 Express 暴露了三个 API 端点。第一个是 GET 端点:
app.get('/dapr/subscribe', (_req, res) => {
  res.json([
    {
      pubsubname: 'pubsub',
      topic: 'A',
      route: 'A',
    },
    {
      pubsubname: 'pubsub',
      topic: 'B',
      route: 'B',
    },
  ]);
});
该段代码是告诉 Dapr 要订阅 pubsub 这个组件的哪些主题,其中的 route 表示使用路由到那个端点来处理消息,当部署(本地或 Kubernetes)时,Dapr 将调用服务以确定它是否订阅了任何内容。其他两个端点是后端点:
app.post('/A', (req, res) => {
  console.log('A: ', req.body.data.message);
  res.sendStatus(200);
});

app.post('/B', (req, res) => {
  console.log('B: ', req.body.data.message);
  res.sendStatus(200);
});
这两个端点处理来自每个主题类型的消息,我们这里只是记录消息,当然在更复杂的应用程序中,这里就是需要处理业务逻辑的地方了。
Python 消息订阅服务
同样导航到 python-subscriber 目录,查看 Python 订阅服务的代码文件 app.py。与 Node.js 订阅者一样,我们暴露了三个 API 端点,只是这里使用的是 flask,第一个是 GET 端点:
@app.route('/dapr/subscribe', methods=['GET'])
def subscribe():
    subscriptions = [{
        'pubsubname': 'pubsub', 'topic': 'A', 'route': 'A'
    }, {
        'pubsubname': 'pubsub', 'topic': 'C', 'route': 'C'
    }]
    return jsonify(subscriptions)
同样的方式,这是告诉 Dapr 要订阅 pubsub 组件的哪些主题,这里我们订阅的组件名为 pubsub 的,主题为 A 和 C,这些主题的消息通过其他两个路由进行处理:
@app.route('/A', methods=['POST'])
def a_subscriber():
    print(f'A: {request.json}', flush=True)
    print('Received message "{}" on topic "{}"'.format(request.json['data']['message'], request.json['topic']), flush=True)
    return json.dumps({'success':True}), 200, {'ContentType':'application/json'}

@app.route('/C', methods=['POST'])
def c_subscriber():
    print(f'C: {request.json}', flush=True)
    print('Received message "{}" on topic "{}"'.format(request.json['data']['message'], request.json['topic']), flush=True)
    return json.dumps({'success':True}), 200, {'ContentType':'application/json'}
React 前端应用
上面是两个订阅服务,接下来查看下发布者,我们的发布者分为客户端和服务器。
客户端是一个简单的单页 React 应用程序,使用 [Create React App] 启动(https://github.com/facebook/create-react-app),相关的客户端代码位于`react-form/client/src/MessageForm.js`,当用户提交表单时,将使用最新的聚合 JSON 数据更新 React 状态。默认情况下,数据设置为:
{
    messageType: "A",
    message: ""
};
提交表单后,聚合的 JSON 数据将发送到服务器:
fetch('/publish', {
  headers: {
    Accept: 'application/json',
    'Content-Type': 'application/json',
  },
  method: 'POST',
  body: JSON.stringify(this.state),
});
服务端是一个典型的 express 应用程序,它暴露了一个 POST 端点:/publish。这样可以从客户端接收请求,并根据 Dapr 发布它们。Express 内置的 JSON 中间件函数用于解析传入请求中的 JSON:
app.use(express.json());
这样我们可以获取到提交的 messageType,可以确定使用哪个主题来发布消息。要使用 Dapr 来发布消息,同样也是直接使用 Dapr 提供的 API 端点 http://localhost:<DAPR_URL>/publish/<PUBSUB_NAME>/<TOPIC> 即可,根据获取到的数据构建 Dapr 消息发布的 URL,提交 JSON 数据,POST 请求还需要在成功完成后返回响应中的成功代码。
const publishUrl = `${daprUrl}/publish/${pubsubName}/${req.body?.messageType}`;
await axios.post(publishUrl, req.body);
return res.sendStatus(200);
daprUrl 的地址所在的端口可以用下面的代码来获取:
const daprUrl = `http://localhost:${process.env.DAPR_HTTP_PORT || 3500}/v1.0`;
默认情况下,Dapr 在 3500 上运行,但如果我们在本地运行 Dapr 并将其设置为其他端口(使用 CLI run 命令中的 --app-port 标志),则该端口将作为环境变量注入应用程序。
此外服务端还通过将默认主页 / 路由请求转发到构建的客户端代码来托管 React 应用程序本身:
app.get('/', function (_req, res) {
  res.sendFile(path.join(__dirname, 'client/build', 'index.html'));
});
所以我们可以直接通过服务端来访问到前端页面。
发布-订阅模式是我们微服务开发中非常重要的一个模式,可以用来实现高可伸缩性和松耦合。发布订阅通常用于需要高度可伸缩的大型应用程序,发布和订阅应用程序通常比传统的 client/server 应用程序具有更好的伸缩性。Pub-sub 允许我们完全解耦组件,发布者不必知道他们的任何订阅者,订阅者也不必知道发布者。这使得开发人员可以编写更精简的微服务,而不会直接依赖彼此。
从上面的示例可以看出 Dapr 中使用发布订阅模式进行开发就完全变成了面向 localhost 编程了。