Dapr
Dapr(Distributed Application Runtime) 是微软于 2019 年 10 月 16 日 首次发布的分布式程序运行时。Dapr 是一个可移植的、事件驱动的运行时,使开发人员可以轻松创建在云和边缘上运行的有弹性、无状态和有状态的应用程序,支持多种开发语言和框架。
基础概念
那么 Dapr 具体是什么意思呢?这里我们要先弄清楚几个概念。
- 分布式程序:大的系统分成彼此独立的小的模块,模块和模块之间通过 API 互相通信,这样每个模块可以用不同的语言开发,一个模块升级的时候不会影响到别的模块。
- 云和边缘:这里的云和边缘指的是 Dapr 的 App 可以跑在 AWS、Azure、GCP 等云服务器上,也可以跑在本地的服务器上。
- 事件驱动:可以理解成 Dapr 在没有监听到请求到来的时候会一直处于待机的状态,什么也不做,只有监听到请求事件来了才开始处理。
- 可移植:写的程序、用的中间件和运行的环境无关,比如说原来运行在 AWS 上,现在想跑在 Azure 上,NoSQL 数据库原来用 DynamoDB,现在想用 CosmosDB,消息中间件原来用 SNS/SQS,现在想用 Service Bus,没有任何问题,只需要在 Dapr 这边做一下切换即可,程序无需改动。
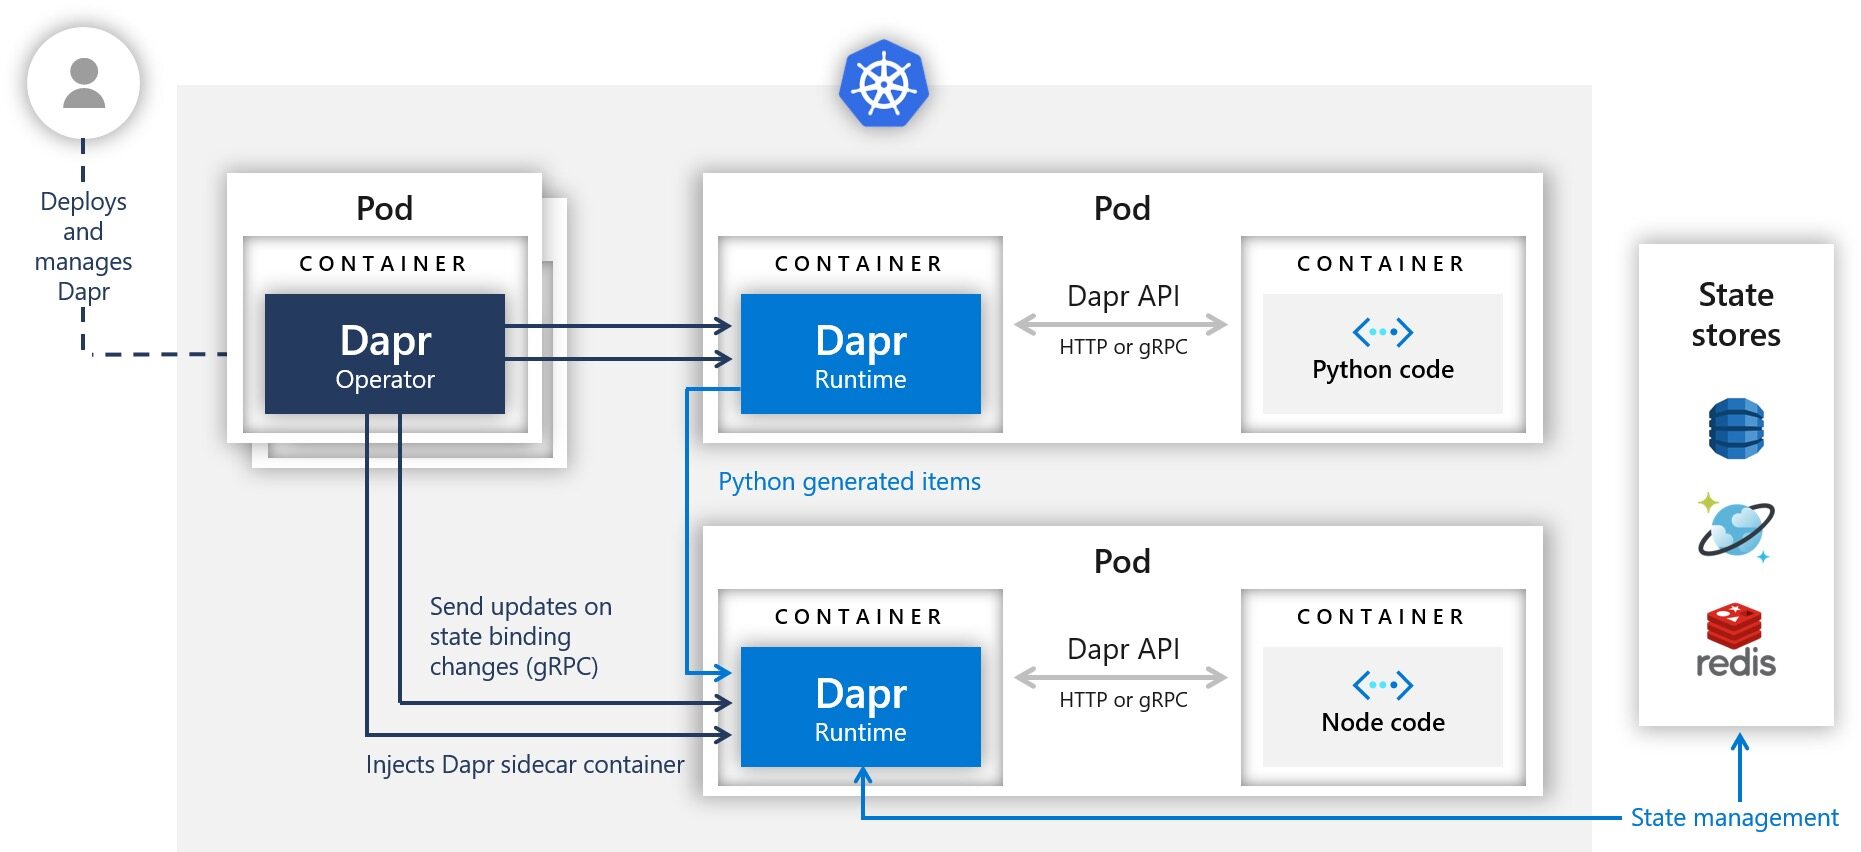
- 运行时:指的是 Dapr 的运行环境,Dapr 的控制面会单独启动,同时你的程序在启动的时候 Dapr 会在你的程序上挂一个 Sidecar,你的程序就可以通过 Sidecar 和 Dapr 的控制平面进行通信,所有挂有 Dapr Sidecar 的各个微服务之间就可以互相调用了,也可以通过 Dapr 调用各种中间件。
- 有弹性:指的是可以从故障中自动恢复的能力,比如说超时、重试等。不会卡住或陷入一种死循环。
- 无状态和有状态:无状态指的是一个微服务经过计算得到结果,返回给调用者以后这个值在微服务这边是不保存的(DB,内存等),有状态指的是在微服务这边要把这个结果保存起来。
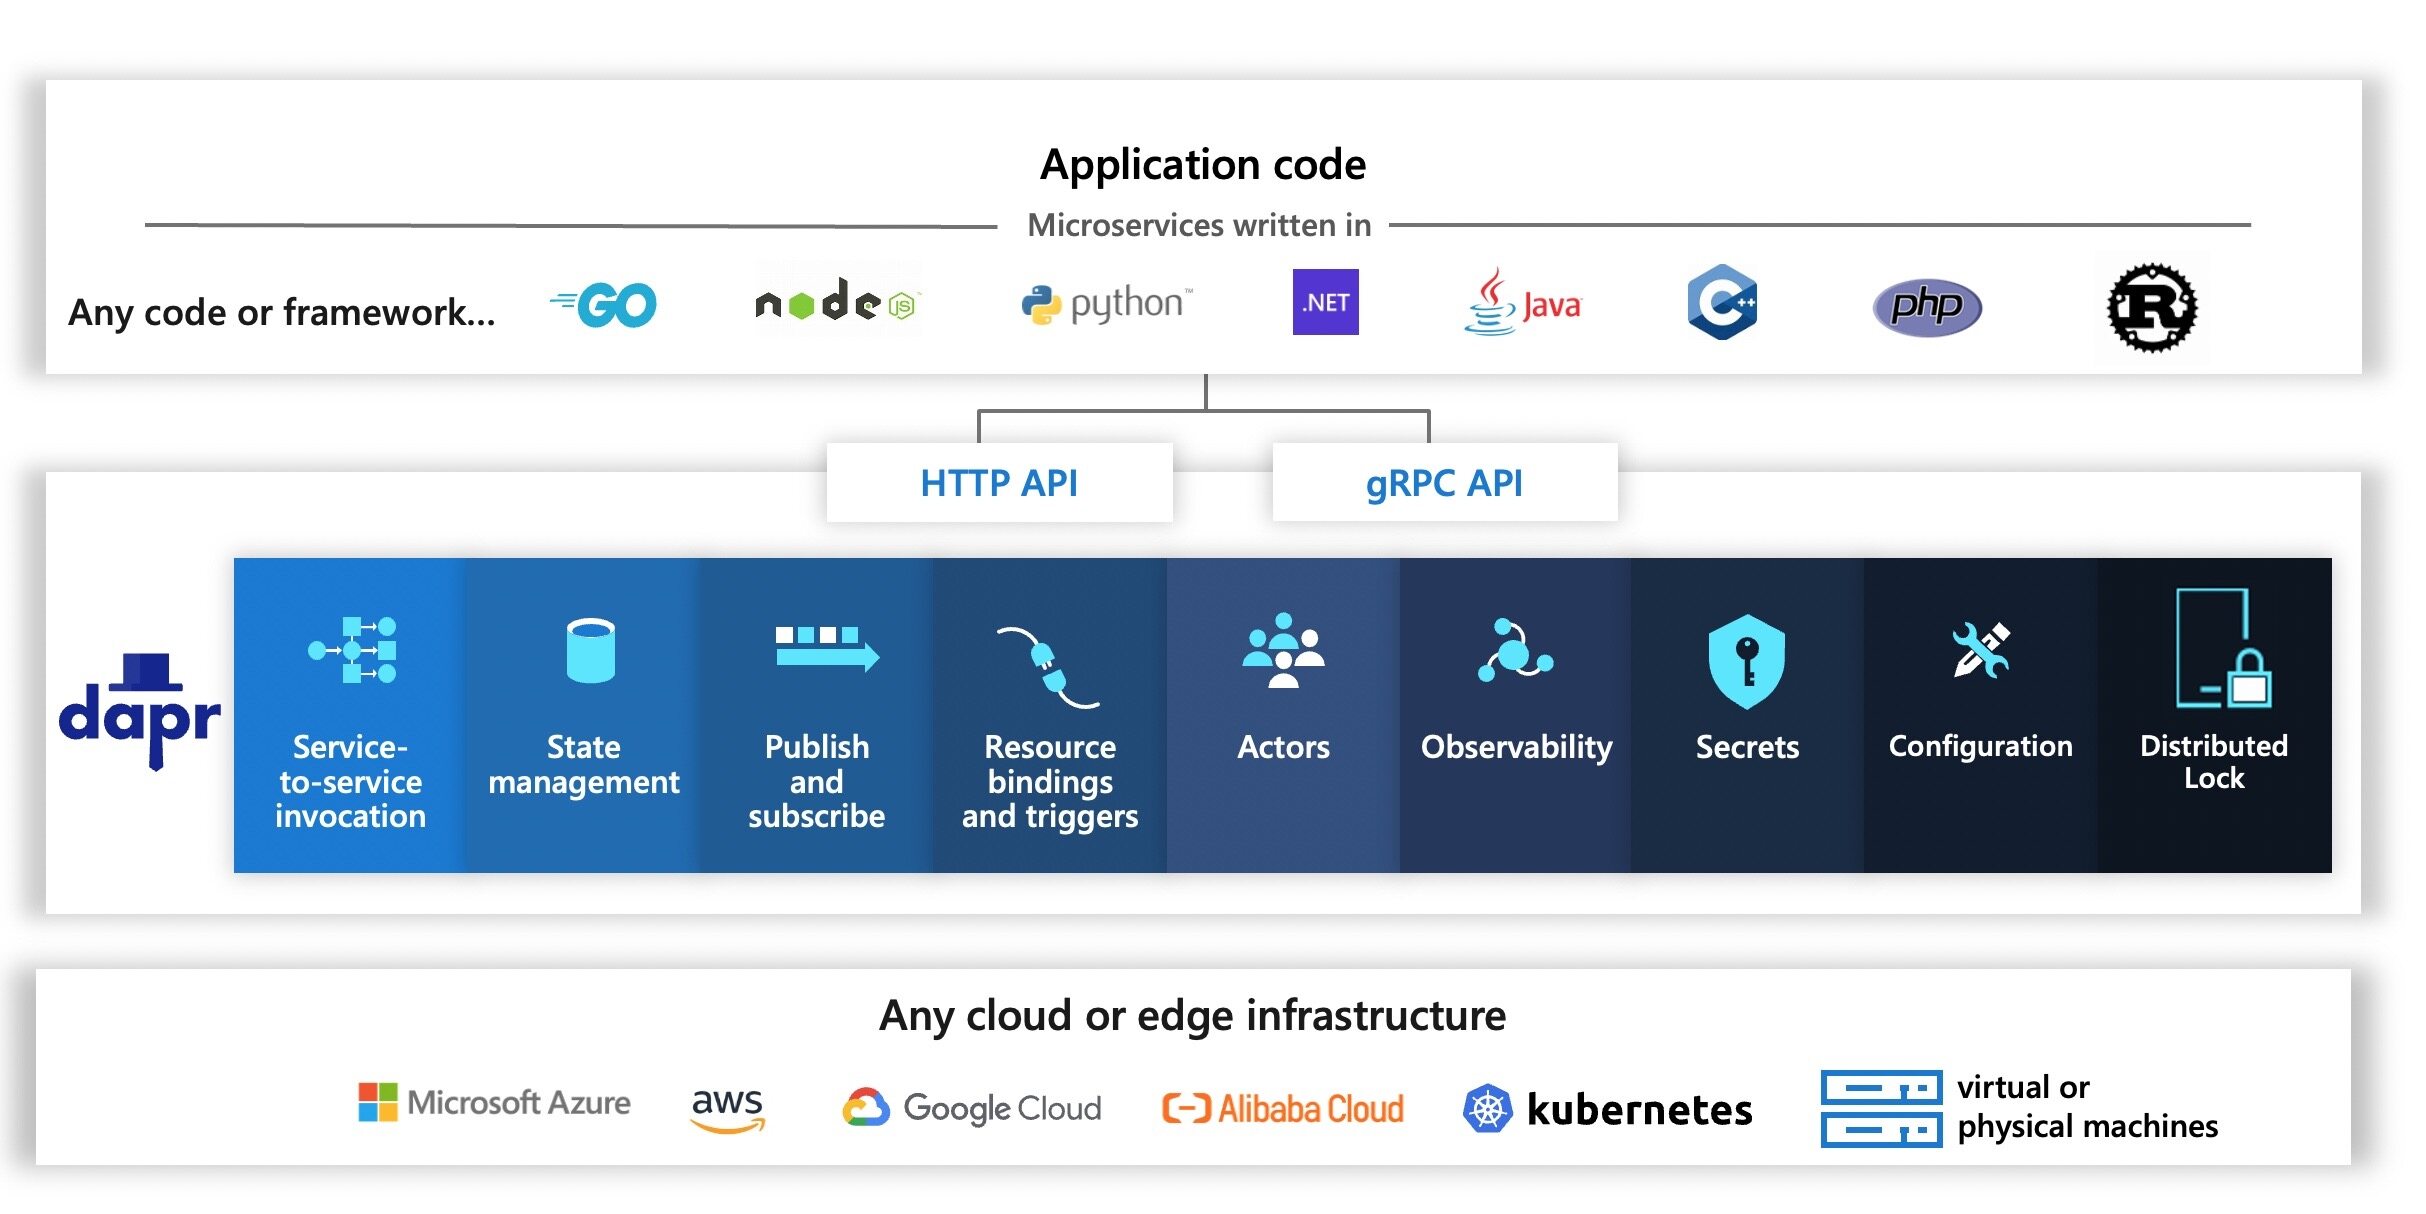
有了上面一些概念的理解后,我们可以重新理解下 Dapr 到底是什么了 - 我的理解是 Dapr 就是一个代理,就是说它把不同组件的接口隐藏了起来,给你提供一个统一的接口让你来通信。这样做的好处不言而喻,不管你的组件怎么变,平台怎么变,我 Dapr 这边只要接口是不变的,你程序就不用变。从程序来看我只是把数据交给 Dapr 就可以了,由 Dapr 来处理,这块的逻辑不写在我的程序逻辑里。所以通过 Dapr 可以做到平台无关,中间件无关,比如你不用 Dapr,而是用 springboot redis 库来实现的 Message Queue,突然有一天不让使用 redis 了,改而使用 rabbitmq,应该怎么办?是不是只能用 springboot rabbitmq 库重写程序。不同于工作在网络层的 Service Mesh,Dapr 算是一个 App Mesh,工作于 APP 层,专注于提供构建模块,使开发人员更容易构建微服务。可以说 Dapr 以开发人员为中心,而 Service Mesh 则以基础架构为中心,两者是可以共存的。
Dapr 提供了很多构建块,构建块是可以从你的代码中调用的 HTTP 或 gRPC API,并且由一个或多个 Dapr 组件组成。Dapr 由一组构建块组成,并且具有可扩展性以添加新的构建块。
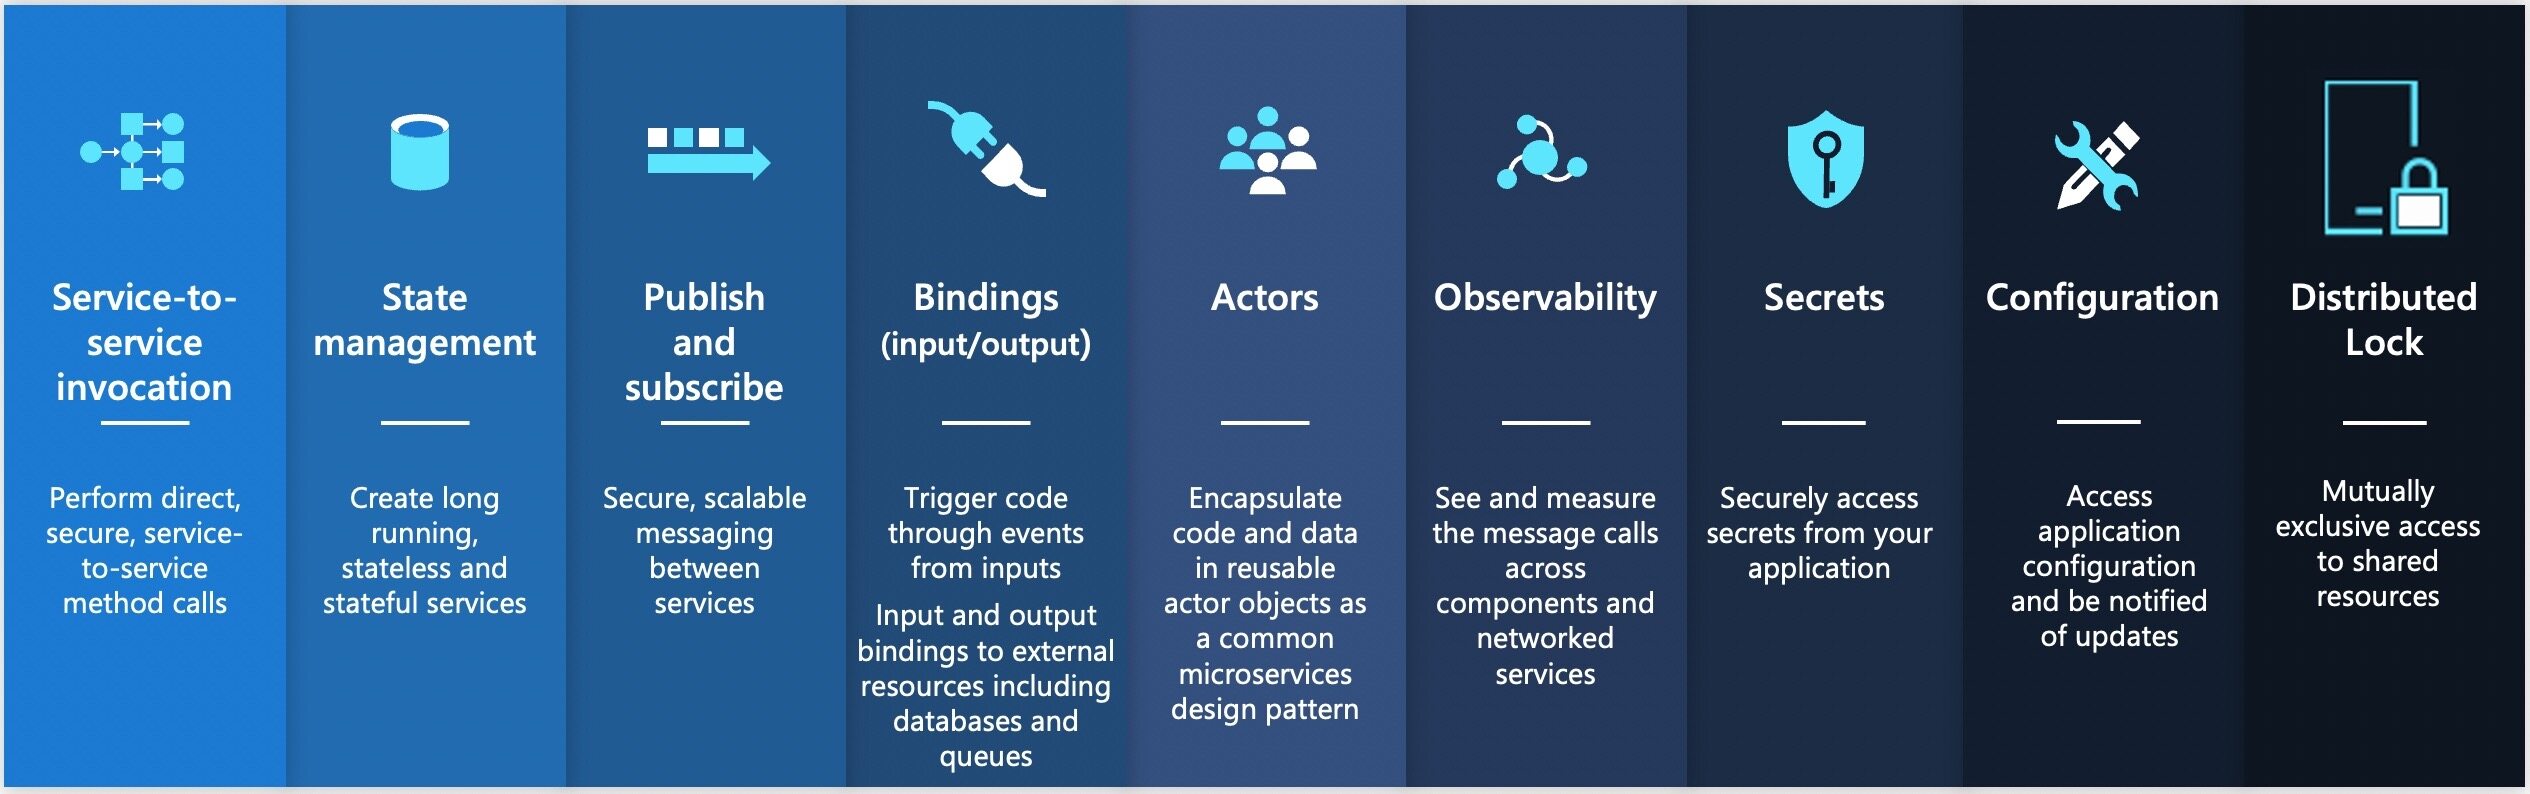
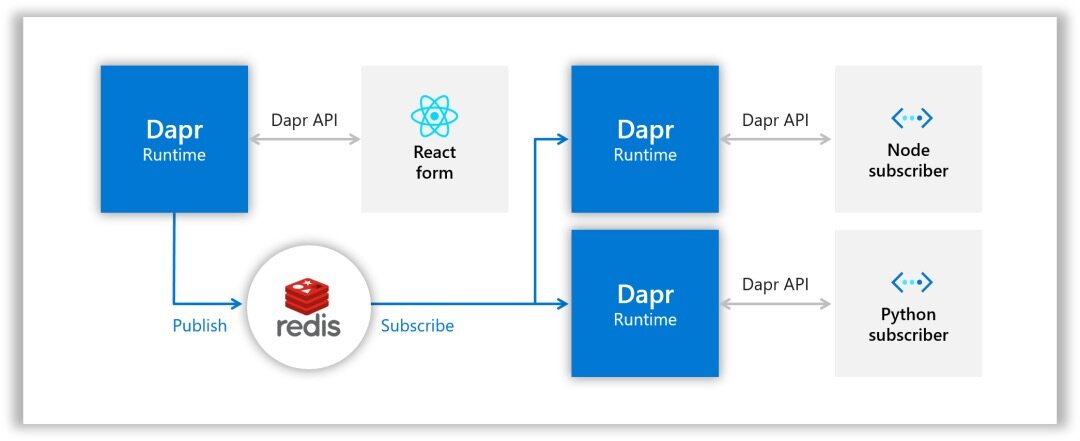
Service-to-service invocation:服务间调用,指的是一个微服务可以通过 Dapr 调用另一个微服务。State management:状态管理,指的是一个微服务通过 Dapr 把状态数据保存到某个地方(PostgreSQL,Redis,DynamoDB 等等)。Publish and subscribe:消息总线(Message Bus),或者说发布者/订阅者模式。一个微服务把消息通过 Dapr 发布给某个 Topic,所有订阅这个 Topic 的微服务都能通过 Dapr 收到这个消息。
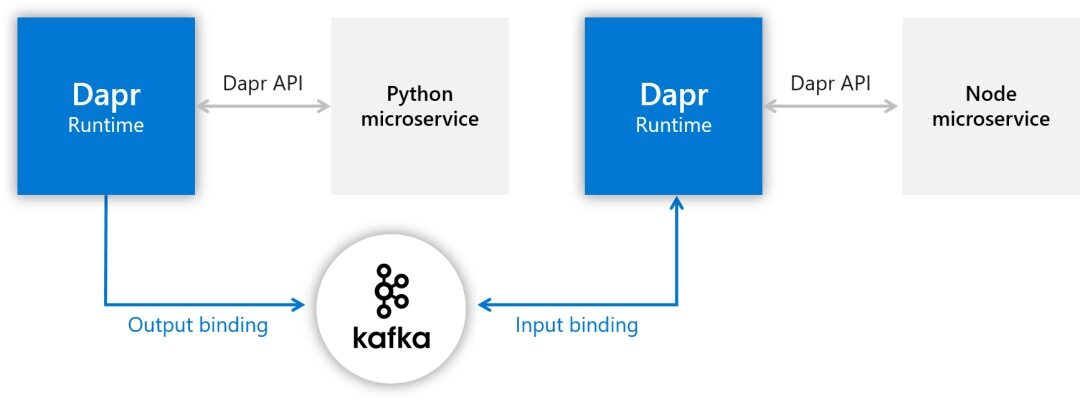
Resource bindings:消息队列,分为两种绑定,一种是输出绑定,一种是输入绑定。出和入是看数据的流向,输出绑定就是作为生产者的 App 把消息通过 Dapr 传给消息队列,输入绑定就是作为消费者的 App 通过 Dapr 从消息队列里得到消息。补充一点,这里的消息队列和 Pub/Sub 里的消息总线有什么区别呢?可以这样理解:一个消息进入消息总线的话,所有订阅者都能得到这个消息,而一个消息进入消息队列的话,由消费者来取,一次只有一个人能得到。此外,消息总线是不要求处理顺序的,两个消息进入消息总线,谁先被拿到顺序是不一定的,而消息队列可以保证是先入先出的。
Actors:Actor 模式,Actor 模型 = 状态 + 行为 + 消息,阐述了 Actors 为最低级别的计算单元。换句话说,你将代码写入独立单元(称为 actor),该单元接收消息并一次处理消息,而不进行任何类型的并行或线程处理。通俗点讲就是并发情况下显式加锁性能不佳、容易出错、导致死锁,actor 模式采用了分区单线程机制能更高效解决并发问题。Observability:可观测性,主要包括 3 个方面:链路追踪 tracing、日志管理 logging、指标管理 metrics。比如使用 Prometheus + Grafana 来查看系统的 Metrics,用 Zipkin 来进行分布链路追踪,用 Elasticsearch + Fluentd + Kibana 来对日志进行检索。Secrets:密钥,指的是一个微服务通过 Dapr 从 Secret Store 取得密钥。Configuration:配置,类似于 Apollo、Nacos、Consul 等配置中心的功能。Distributed lock:分布式锁,分布式锁 API 使你能够对资源进行锁定,以便应用程序的多个实例可以访问资源而不会发生冲突并提供一致性保证。
安装
首先我们需要安装 Dapr CLI 工具来管理 Dapr 相关任务,通过该命令行工具我们可以使用它来:
- 使用 Dapr sidecar 运行应用
- 查看 sidecar 日志
- 列出正在运行的服务
- 运行 Dapr Dashboard
安装 Dapr CLI 最简单的方法就是直接在终端中执行下面的命令,该命令会将 Dapr CLI 安装到 /usr/local/bin 目录下面:
$ wget -q https://raw.githubusercontent.com/dapr/cli/master/install/install.sh -O - | /bin/bash
对于 Mac 系统也可以使用 Homebrew 进行一键安装:
$ brew install dapr/tap/dapr-cli
当然我们也可以通过手动下载并安装 Dapr CLI,前往 Release 页面 https://github.com/dapr/cli/releases 下载对应的 Dapr CLI,解压后将其移动到 PATH 路径下面即可。
安装完成后我们可以执行 dapr 命令来验证是否安装成功,正常会输出如下所示的提示信息:
$ dapr

      __
     ____/ /___ _____  _____
    / __  / __ '/ __ \/ ___/
   / /_/ / /_/ / /_/ / /
   \__,_/\__,_/ .___/_/
         /_/

===============================
Distributed Application Runtime

Usage:
  dapr [command]

Available Commands:
  annotate       Add dapr annotations to a Kubernetes configuration. Supported platforms: Kubernetes
  build-info     Print build info of Dapr CLI and runtime
  completion     Generates shell completion scripts
  components     List all Dapr components. Supported platforms: Kubernetes
  configurations List all Dapr configurations. Supported platforms: Kubernetes
  dashboard      Start Dapr dashboard. Supported platforms: Kubernetes and self-hosted
  help           Help about any command
  init           Install Dapr on supported hosting platforms. Supported platforms: Kubernetes and self-hosted
  invoke         Invoke a method on a given Dapr application. Supported platforms: Self-hosted
  list           List all Dapr instances. Supported platforms: Kubernetes and self-hosted
  logs           Get Dapr sidecar logs for an application. Supported platforms: Kubernetes
  mtls           Check if mTLS is enabled. Supported platforms: Kubernetes
  publish        Publish a pub-sub event. Supported platforms: Self-hosted
  run            Run Dapr and (optionally) your application side by side. Supported platforms: Self-hosted
  status         Show the health status of Dapr services. Supported platforms: Kubernetes
  stop           Stop Dapr instances and their associated apps. Supported platforms: Self-hosted
  uninstall      Uninstall Dapr runtime. Supported platforms: Kubernetes and self-hosted
  upgrade        Upgrades or downgrades a Dapr control plane installation in a cluster. Supported platforms: Kubernetes
  version        Print Dapr runtime and Cli version.

Flags:
  -h, --help          help for dapr
      --log-as-json   Log output in JSON format
  -v, --version       version for dapr

Use "dapr [command] --help" for more information about a command.
$ dapr version
CLI version: 1.8.0
Runtime version: n/a
我们可以看到 CLI 工具安装成功了,但是还没有对应的运行时,Dapr 有两种运行时模式,一个是自拓管模式,一个是 Kubernetes mode,自拓管模式相当于 Dapr sidecar 以本地计算机上的一个进程运行,这里我们还是以 Kubernetes 模式来作为 Dapr 的运行时。
首先当然需要一个 Kubernetes 集群,我们这里使用 Helm Chart 的方式来安装 Dapr 运行时环境(也可以直接使用 dapr init --kubernetes --wait 命令进行安装)。
$ helm repo add dapr https://dapr.github.io/helm-charts/
$ helm repo update
$ helm install dapr dapr/dapr --namespace dapr-system --create-namespace
NAME: dapr
LAST DEPLOYED: Mon Aug  1 16:17:01 2022
NAMESPACE: dapr-system
STATUS: deployed
REVISION: 1
TEST SUITE: None
NOTES:
Thank you for installing Dapr: High-performance, lightweight serverless runtime for cloud and edge

Your release is named dapr.

To get started with Dapr, we recommend using our quickstarts:
https://github.com/dapr/quickstarts

For more information on running Dapr, visit:
https://dapr.io
$ helm ls -n dapr-system
NAME    NAMESPACE   REVISION    UPDATED                                 STATUS      CHART       APP VERSION
dapr    dapr-system 1           2022-08-01 16:17:01.137153 +0800 CST    deployed    dapr-1.8.3  1.8.3
该 Chart 包实际上会在 Kubernetes 集群上部署 Dapr 的控制平面系统服务,可以通过 dapr status --kubernetes 命令来获取 Dapr 服务的状态:
$ dapr status --kubernetes # -k
  NAME                   NAMESPACE    HEALTHY  STATUS   REPLICAS  VERSION  AGE  CREATED
  dapr-sentry            dapr-system  True     Running  1         1.8.3    10m  2022-08-02 14:52.26
  dapr-sidecar-injector  dapr-system  True     Running  1         1.8.3    10m  2022-08-02 14:52.26
  dapr-operator          dapr-system  True     Running  1         1.8.3    10m  2022-08-02 14:52.26
  dapr-placement-server  dapr-system  True     Running  1         1.8.3    10m  2022-08-02 14:52.26
  dapr-dashboard         dapr-system  True     Running  1         0.10.0   10m  2022-08-02 14:52.26
对应在 dapr-system 命名空间下面部署如下所示的几个 Pod:
$ kubectl get pods -n dapr-system
NAME                                     READY   STATUS    RESTARTS   AGE
dapr-dashboard-648f7b6768-dgtv5          1/1     Running   0          10m
dapr-operator-74dcdfb44d-lskg7           1/1     Running   0          10m
dapr-placement-server-0                  1/1     Running   0          10m
dapr-sentry-798dcb78f9-rh4wd             1/1     Running   0          10m
dapr-sidecar-injector-7c94bd87f4-cjpgd   1/1     Running   0          10m
从上可以看到一共启动了 5 个 Pod:dapr-dashboard、dapr-operator、dapr-placement、dapr-sentry 以及 dapr-sidecar-injector。
dapr-dashboard负责管理 Dapr Dashboarddapr-operator管理 Dapr Component 的更新和 Kubernetes Service Endpoint(状态存储、pub/sub 等)dapr-sidecar-injector负责将 Dapr 的 sidecar 注入带上 Dapr 注释的 Pod(如果 App 的 Deploy 里有dapr.io/app-id、dapr.io/app-port之类的 annotation,就会被注入 Dapr sidecar,这时你会发现 Pod 里有两个 Container)dapr-placement用于 Actor,创建将 Actor 实例映射到 Pod 的映射表。dapr-sentry负责管理服务之间的 mTLS 并充当证书颁发机构。
除此之外还有 6 个 Service:
$ kubectl get svc -n dapr-system
NAME                    TYPE        CLUSTER-IP       EXTERNAL-IP   PORT(S)              AGE
dapr-api                ClusterIP   10.107.191.215   <none>        80/TCP               11m
dapr-dashboard          ClusterIP   10.100.46.206    <none>        8080/TCP             11m
dapr-placement-server   ClusterIP   None             <none>        50005/TCP,8201/TCP   11m
dapr-sentry             ClusterIP   10.108.122.153   <none>        80/TCP               11m
dapr-sidecar-injector   ClusterIP   10.96.129.189    <none>        443/TCP              11m
dapr-webhook            ClusterIP   10.111.207.169   <none>        443/TCP              11m
我们可以修改 dapr-dashboard 的 Service 为 NodePort 类型,或者创建一个 Ingress 对象来暴露 Dashboard 服务,此外也可以直接通过 dapr dashboard 命令来暴露该服务,如下所示:
$ dapr dashboard -k
ℹ️  Dapr dashboard found in namespace:   dapr-system
ℹ️  Dapr dashboard available at: http://localhost:8080
我们这里安装的 Dapr 运行时是 Kubernetes,所以用了一个 -k 参数,还可以使用 -a 指定暴露的 IP 地址,-p 指定暴露的端口,这里我们可以就通过 Dapr CLI 所在节点的 IP 加上 8080 端口访问 Dapr Dashboard,如下图所示:
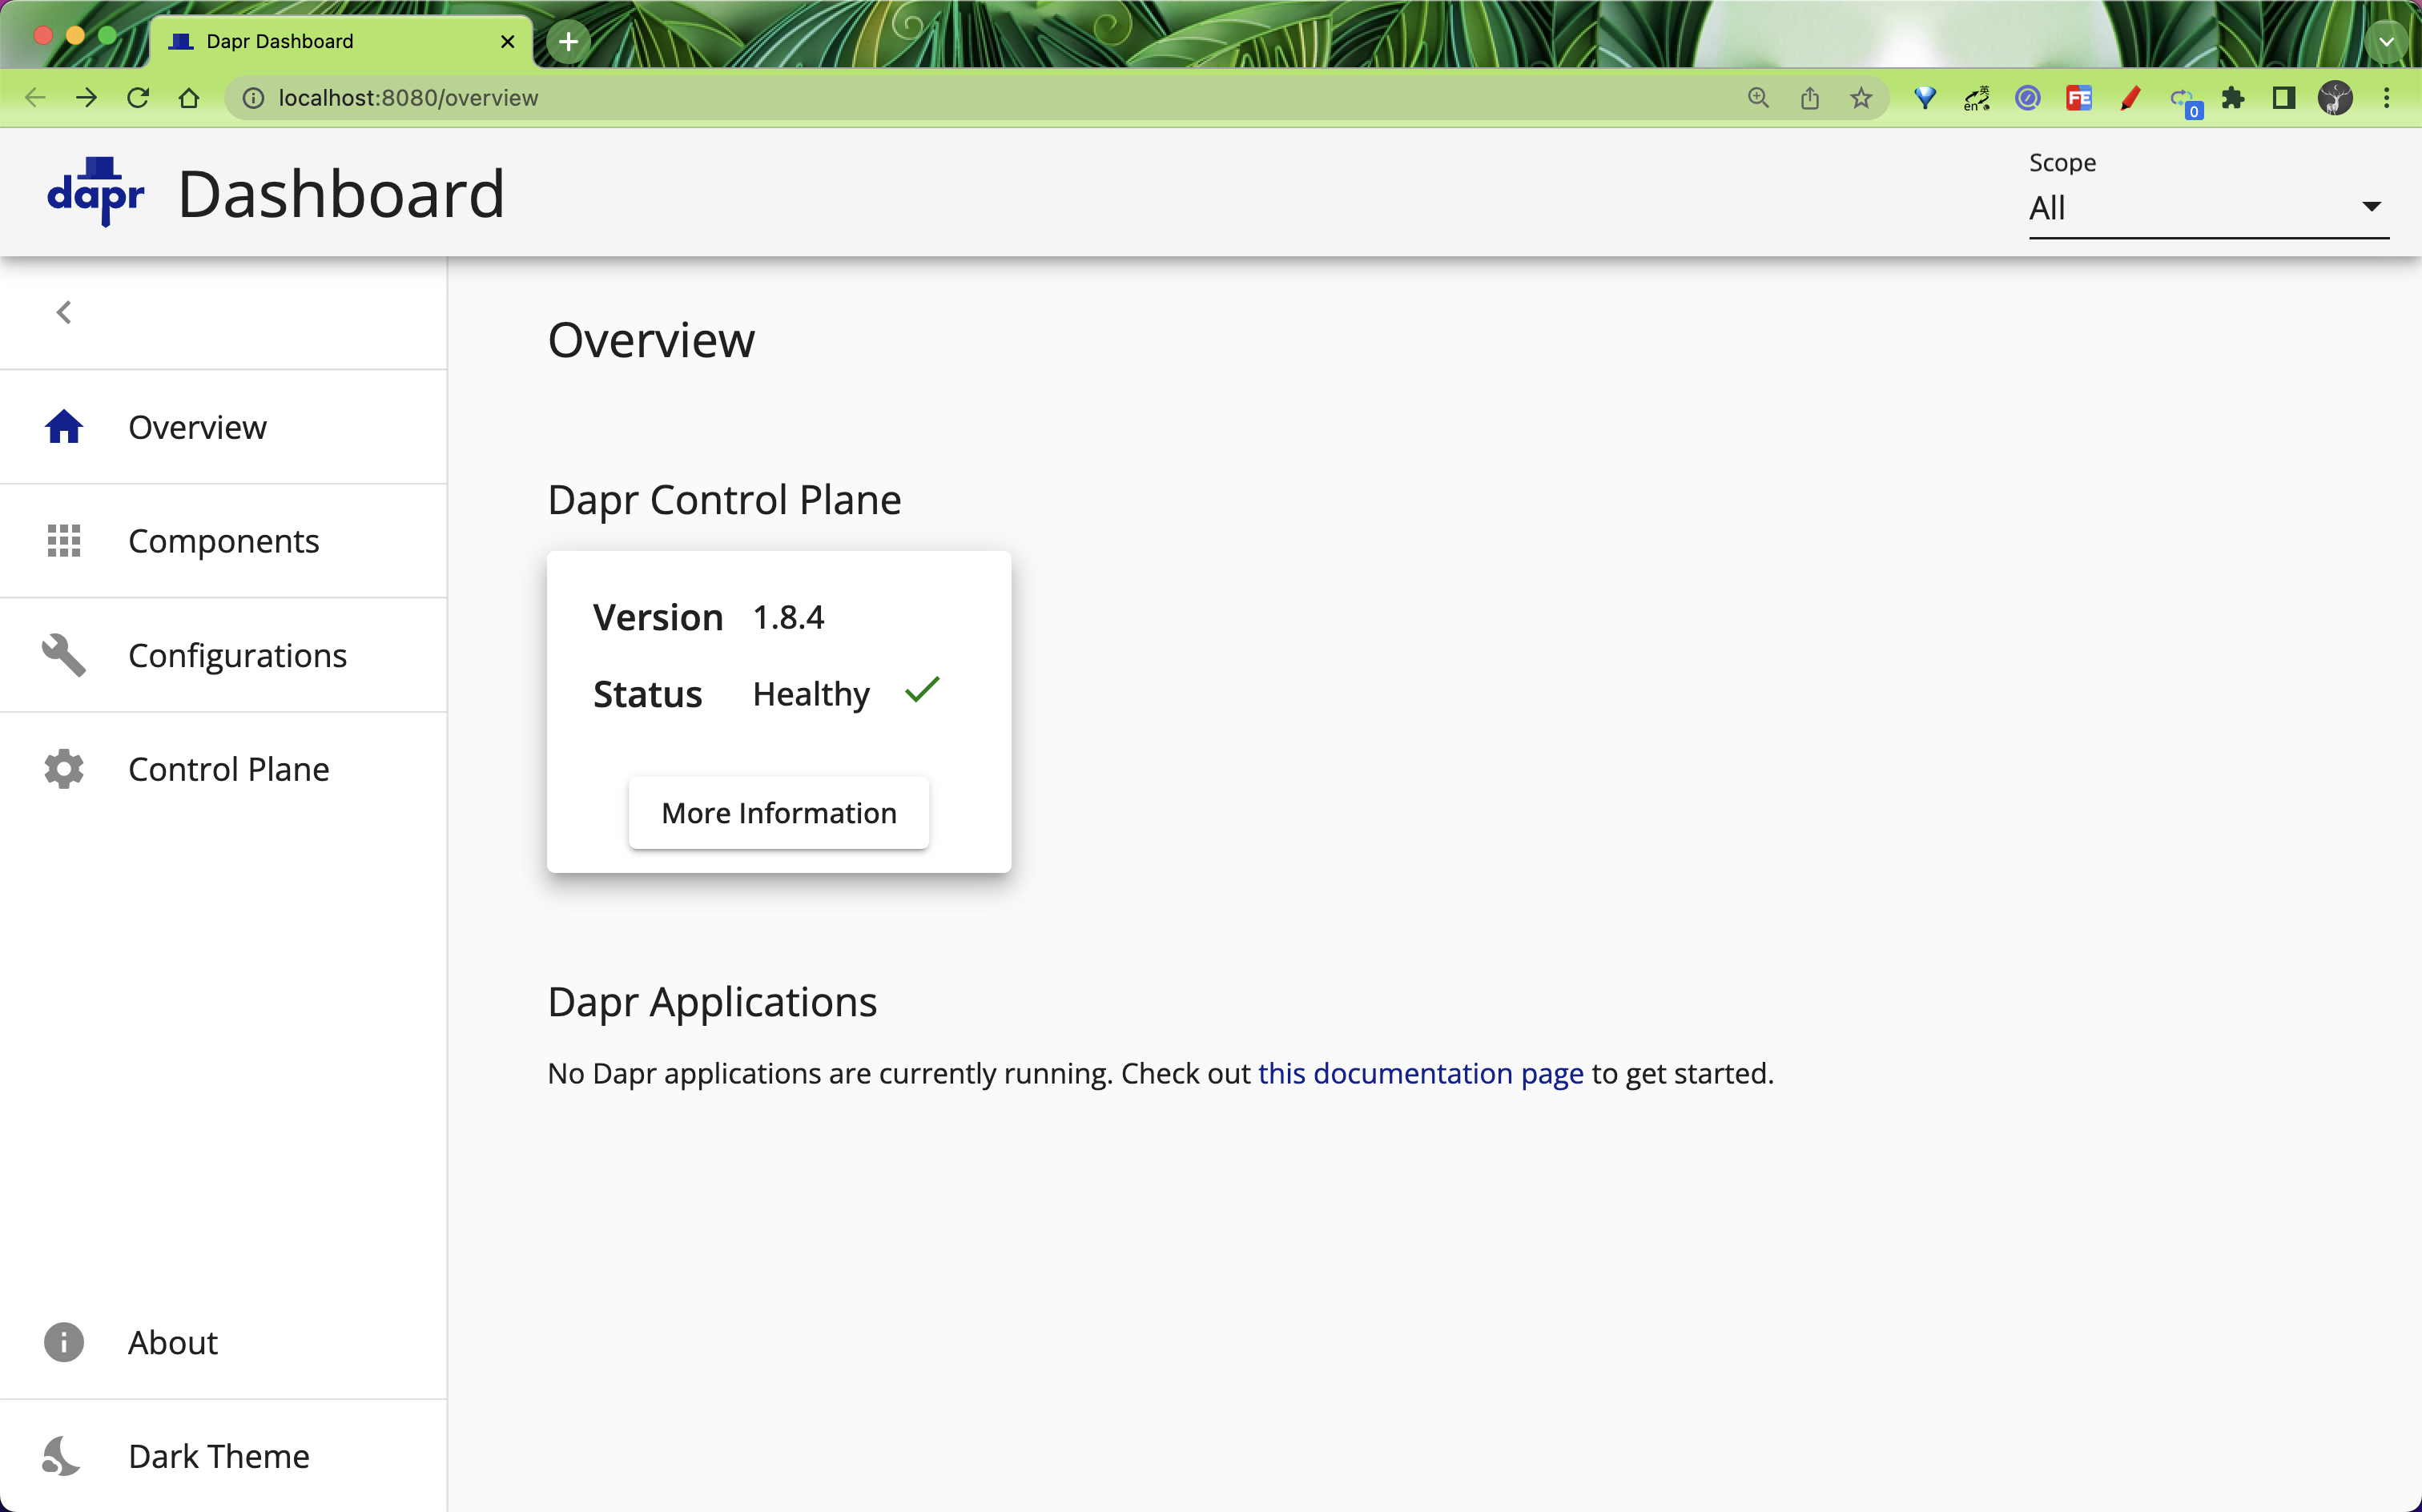
示例
$ git clone -b v1.8.0 https://github.com/dapr/quickstarts.git
$ cd quickstarts/tutorials/hello-kubernetes/
该示例应用里面包括一个 Python 的程序,每秒发 1 个 HTTP 请求到 Node 服务去,该 Node 服务会用来在 StateStore 里保存发过来的 OrderId。
这里我们将状态管理保存到 Redis 服务中,Kubernetes 模式的 Dapr Runtime 安装的时候并不会自动安装 Redis,所以我们需要先手动安装 Redis 服务。这里我们使用 Bitnami 提供的 Redis Chart 包来安装:
$ helm repo add bitnami https://charts.bitnami.com/bitnami
$ helm repo update
$ helm install redis bitnami/redis
NAME: redis
LAST DEPLOYED: Wed Aug  3 10:22:54 2022
NAMESPACE: default
STATUS: deployed
REVISION: 1
TEST SUITE: None
NOTES:
CHART NAME: redis
CHART VERSION: 17.0.6
APP VERSION: 7.0.4

** Please be patient while the chart is being deployed **

Redis® can be accessed on the following DNS names from within your cluster:

    redis-master.default.svc.cluster.local for read/write operations (port 6379)
    redis-replicas.default.svc.cluster.local for read-only operations (port 6379)


To get your password run:

    export REDIS_PASSWORD=$(kubectl get secret --namespace default redis -o jsonpath="{.data.redis-password}" | base64 -d)

To connect to your Redis® server:

1. Run a Redis® pod that you can use as a client:

   kubectl run --namespace default redis-client --restart='Never'  --env REDIS_PASSWORD=$REDIS_PASSWORD  --image docker.io/bitnami/redis:7.0.4-debian-11-r4 --command -- sleep infinity

   Use the following command to attach to the pod:

   kubectl exec --tty -i redis-client \
   --namespace default -- bash

2. Connect using the Redis® CLI:
   REDISCLI_AUTH="$REDIS_PASSWORD" redis-cli -h redis-master
   REDISCLI_AUTH="$REDIS_PASSWORD" redis-cli -h redis-replicas

To connect to your database from outside the cluster execute the following commands:

    kubectl port-forward --namespace default svc/redis-master 6379:6379 &
    REDISCLI_AUTH="$REDIS_PASSWORD" redis-cli -h 127.0.0.1 -p 6379
安装完成后会创建如下所示的几个 Pod:
$ kubectl get pods
NAME               READY   STATUS    RESTARTS   AGE
redis-master-0     1/1     Running   0          6m19s
redis-replicas-0   1/1     Running   0          6m19s
redis-replicas-1   1/1     Running   0          4m22s
redis-replicas-2   1/1     Running   0          4m
$ kubectl get svc
NAME             TYPE        CLUSTER-IP     EXTERNAL-IP   PORT(S)    AGE
redis-headless   ClusterIP   None           <none>        6379/TCP   6m42s
redis-master     ClusterIP   10.105.26.9    <none>        6379/TCP   6m42s
redis-replicas   ClusterIP   10.109.37.68   <none>        6379/TCP   6m42s
部署成功后我们可以通过 redis-master:6379 服务来访问 Redis,接下来我们需要部署一个使用 Redis 来做状态存储的组件,Dapr 的 Kubernetes 运行时中提供了一个名为 Component 的 CRD 对象,可以通过该对象来声明一个组件,在我们这个示例中,对应的资源清单已经包含了,只需要执行下面的命令即可:
$ kubectl apply -f deploy/redis.yaml
component.dapr.io/statestore created
该 Component 对象的资源清单如下所示:
apiVersion: dapr.io/v1alpha1
kind: Component
metadata:
  name: statestore
spec:
  type: state.redis
  version: v1
  metadata:
    - name: redisHost
      value: redis-master:6379
    - name: redisPassword
      secretKeyRef:
        name: redis
        key: redis-password
auth:
  secretStore: kubernetes
在上面的对象中定义的 spec.type 类型为 state.redis,表示使用的是使用 Redis 来做状态管理,spec.metadata 中的 redisHost 属性用来指定 Redis 访问的 Host 地址,redisPassword 指定 Redis 服务访问的密码,对应的信息都是上面通过 Bitnami 的 Chart 包安装提供的,还有一个需要注意的是 auth.secretStore: kubernetes,表示用来存储 Dapr Secret 信息的是使用 Kubernetes 集群。
创建后我们可以通过 dapr components 命令来查看启用的组件列表:
$ dapr components -k --namespace default
  NAMESPACE  NAME        TYPE         VERSION  SCOPES  CREATED              AGE
  default    statestore  state.redis  v1               2022-08-03 10:34.09  6m
接下来我们先部署 Node 服务:
$ kubectl apply -f  deploy/node.yaml
service/nodeapp created
deployment.apps/nodeapp created
该服务的资源清单如下所示:
kind: Service
apiVersion: v1
metadata:
  name: nodeapp
  labels:
    app: node
spec:
  selector:
    app: node
  ports:
    - protocol: TCP
      port: 80
      targetPort: 3000
  type: LoadBalancer
---
apiVersion: apps/v1
kind: Deployment
metadata:
  name: nodeapp
  labels:
    app: node
spec:
  replicas: 1
  selector:
    matchLabels:
      app: node
  template:
    metadata:
      labels:
        app: node
      annotations:
        dapr.io/enabled: 'true'
        dapr.io/app-id: 'nodeapp'
        dapr.io/app-port: '3000'
        dapr.io/enable-api-logging: 'true'
    spec:
      containers:
        - name: node
          image: ghcr.io/dapr/samples/hello-k8s-node:latest
          env:
            - name: APP_PORT
              value: '3000'
          ports:
            - containerPort: 3000
          imagePullPolicy: Always
从上面对象的定义可以看到 Node 服务中只包含一个容器,但是要注意上面添加了几个 annotations,其中的 dapr.io/enabled: "true" 表示会开启 Dapr 的 Sidecar 容器,所以部署后会变成两个容器。
$ kubectl get pods -l app=node
NAME                      READY   STATUS    RESTARTS       AGE
nodeapp-c98c589fb-f52h4   2/2     Running   1 (149m ago)   3h13m
接着我们再部署 Python 这个服务:
$ kubectl apply -f deploy/python.yaml
deployment.apps/pythonapp created
该服务的资源清单如下所示:
apiVersion: apps/v1
kind: Deployment
metadata:
  name: pythonapp
  labels:
    app: python
spec:
  replicas: 1
  selector:
    matchLabels:
      app: python
  template:
    metadata:
      labels:
        app: python
      annotations:
        dapr.io/enabled: 'true'
        dapr.io/app-id: 'pythonapp'
        dapr.io/enable-api-logging: 'true'
    spec:
      containers:
        - name: python
          image: ghcr.io/dapr/samples/hello-k8s-python:latest
可以看到上述 Python 服务中也注入了 Dapr 的几个 annotations,所以该服务部署后同样会自动新增一个 Dapr 的 Sidecar 容器。
$ kubectl get pods
NAME                        READY   STATUS    RESTARTS       AGE
nodeapp-c98c589fb-f52h4     2/2     Running   0              3h27m
pythonapp-7c5f644dd-w92z6   2/2     Running   0              7m58s
redis-master-0              1/1     Running   0              3h51m
redis-replicas-0            1/1     Running   0              3h51m
redis-replicas-1            1/1     Running   0              3h49m
redis-replicas-2            1/1     Running   0              3h48m
当 Python 服务启动后就会每隔 1s 向 Node 服务发起一个 POST 请求,我们可以通过查看 Node 服务日志来验证:
$ kubectl logs nodeapp-c98c589fb-f52h4 -c node
Node App listening on port 3000!
Got a new order! Order ID: 1
Successfully persisted state.
Got a new order! Order ID: 2
Successfully persisted state.
Got a new order! Order ID: 3
Successfully persisted state.
Got a new order! Order ID: 4
Successfully persisted state.
Got a new order! Order ID: 5
Successfully persisted state.
......
同时也可以观察 API 调用日志,状态 API 调用的时候可以看到如下所示的日志:
$ kubectl logs --selector=app=node -c daprd --tail=-1
time="2022-08-03T06:57:39.967874544Z" level=info msg="HTTP API Called: POST /v1.0/state/statestore" app_id=nodeapp instance=nodeapp-c98c589fb-f52h4 scope=dapr.runtime.http-info type=log ver=1.8.3
time="2022-08-03T06:57:40.976952697Z" level=info msg="HTTP API Called: POST /v1.0/state/statestore" app_id=nodeapp instance=nodeapp-c98c589fb-f52h4 scope=dapr.runtime.http-info type=log ver=1.8.3
......
同样也可以查看 Python 应用的 API 调用日志:
$ kubectl logs --selector=app=python -c daprd --tail=-1
time="2022-08-03T06:59:47.054145812Z" level=info msg="HTTP API Called: POST /neworder" app_id=pythonapp instance=pythonapp-7c5f644dd-w92z6 scope=dapr.runtime.http-info type=log ver=1.8.3
time="2022-08-03T06:59:48.062436315Z" level=info msg="HTTP API Called: POST /neworder" app_id=pythonapp instance=pythonapp-7c5f644dd-w92z6 scope=dapr.runtime.http-info type=log ver=1.8.3
同样我们可以通过 Node 服务查看到最新的 Order 信息:
$ curl http://10.173.32.11:32307/order
{"orderId":474}
除了直接通过 Node 服务提供的接口获取到 Order 信息之外,我们还可以通过 Dapr 的 Sidecar 容器去调用该接口。
$ kubectl port-forward nodeapp-c98c589fb-f52h4 8888:3500
Forwarding from 127.0.0.1:8888 -> 3500
Forwarding from [::1]:8888 -> 3500
Handling connection for 8888
然后重新开一个终端,通过 Dapr Sidecar 调用 Node 服务的 order 接口:
$ curl http://127.0.0.1:8888/v1.0/invoke/nodeapp/method/order/
{"orderId":999}
这里需要注意的是 Node 服务在获取到 Python 服务发过来的 order 信息后,并不是直接保存到 Redis 中去的,而是直接将数据发送给 Dapr Sidecar 提供的 state 接口,相关代码如下所示:
// These ports are injected automatically into the container.
const daprPort = process.env.DAPR_HTTP_PORT ?? '3500';
const daprGRPCPort = process.env.DAPR_GRPC_PORT ?? '50001';

const stateStoreName = `statestore`;
const stateUrl = `http://localhost:${daprPort}/v1.0/state/${stateStoreName}`; // 状态
const port = process.env.APP_PORT ?? '3000';

app.post('/neworder', async (req, res) => {
  const data = req.body.data;
  const orderId = data.orderId;
  console.log('Got a new order! Order ID: ' + orderId);

  const state = [
    {
      key: 'order',
      value: data,
    },
  ];

  try {
    const response = await fetch(stateUrl, {
      method: 'POST',
      body: JSON.stringify(state),
      headers: {
        'Content-Type': 'application/json',
      },
    });
    if (!response.ok) {
      throw 'Failed to persist state.';
    }
    console.log('Successfully persisted state.');
    res.status(200).send();
  } catch (error) {
    console.log(error);
    res.status(500).send({ message: error });
  }
});
Dapr 控制平面会将数据保存到配置的状态管理组件中去,我们这里就是对应的 Redis 服务中,而对于我们的微服务中的业务代码完全不需要和具体的中间件打交道,以后想要更换一个中间件,也只需要在 Dapr 控制平面侧进行替换即可,对于业务代码没有任何影响。
$ export REDIS_PASSWORD=$(kubectl get secret --namespace default redis -o jsonpath="{.data.redis-password}" | base64 --decode)
$ kubectl run --namespace default redis-client --rm --tty -i --restart='Never' \
 --env REDIS_PASSWORD=$REDIS_PASSWORD \
    --image 7.0.4-debian-11-r4 -- bash
If you don't see a command prompt, try pressing enter.
I have no name!@redis-client:/$ redis-cli -h redis-master -a $REDIS_PASSWORD
Warning: Using a password with '-a' or '-u' option on the command line interface may not be safe.
redis-master:6379> hgetall nodeapp||order
从这个简单示例我们基本上可以体会到 Dapr 对于分布式微服务开发的便利,这里我们只体验了 Dapr 提供的状态管理功能,还有其他更多的功能需要我们来探索。